Wednesday, 30 January 2019

MongoDB Replication set up


We will have 3 instance of Mongo In order to achieve the Replication in MongoDB.

C:\Program Files\MongoDB\Server\4.0\bin>mongod --smallfiles --oplogSize 50 --replSet test --port 27017 --dbpath C:\data\db

C:\Program Files\MongoDB\Server\4.0\bin>mongod --smallfiles --oplogSize 50 --replSet test --port 27018 --dbpath D:\data\db

C:\Program Files\MongoDB\Server\4.0\bin>mongod --smallfiles --oplogSize 50 --replSet test --port 27019 --dbpath E:\data\db
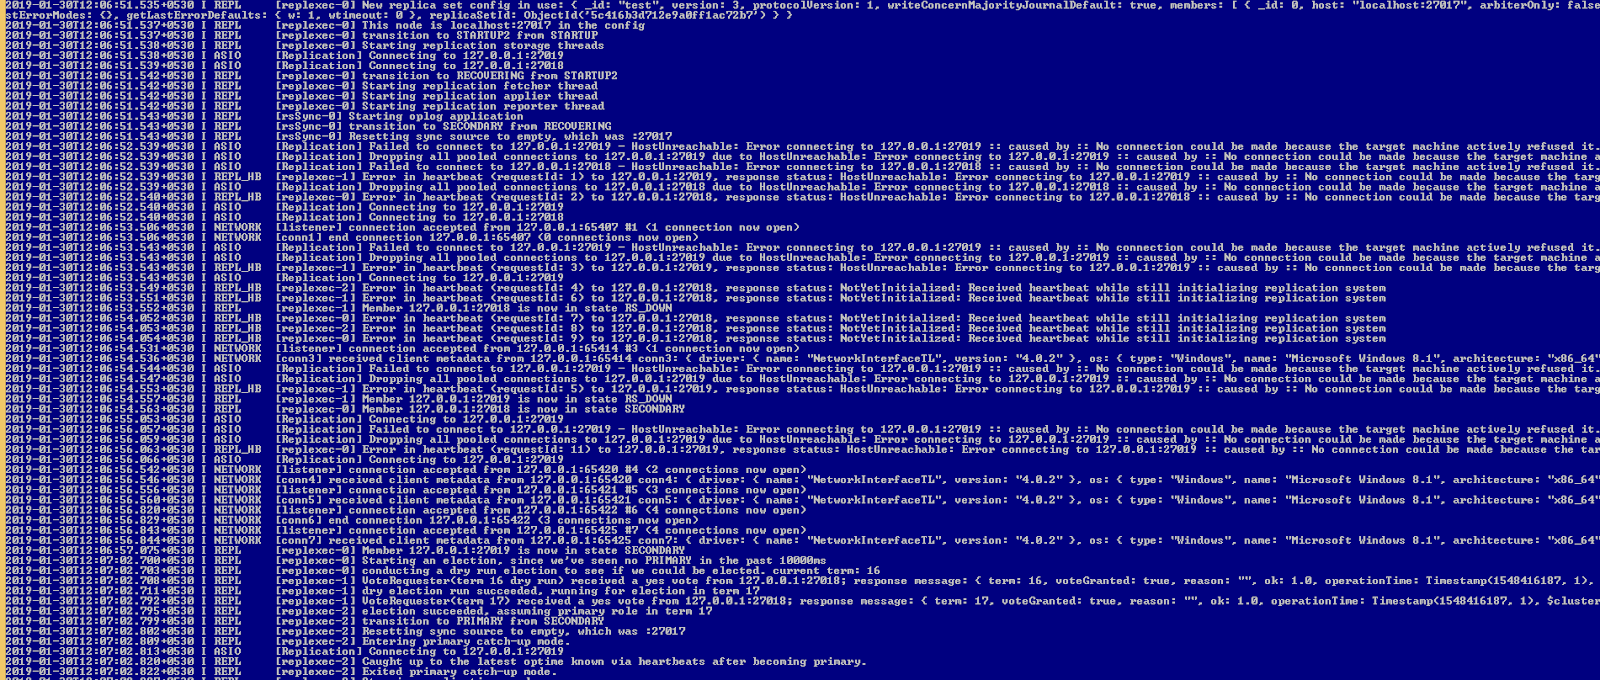


C:\>cd "\Program Files\MongoDB\Server\4.0\bin"


C:\Program Files\MongoDB\Server\4.0\bin>mongo
MongoDB shell version v4.0.2
connecting to: mongodb://127.0.0.1:27017
MongoDB server version: 4.0.2
Server has startup warnings:
2019-01-24T10:26:02.197+0530 I CONTROL  [initandlisten]
2019-01-24T10:26:02.197+0530 I CONTROL  [initandlisten] ** WARNING: Access control is not enabled for the d
2019-01-24T10:26:02.198+0530 I CONTROL  [initandlisten] **          Read and write access to data and confi
2019-01-24T10:26:02.198+0530 I CONTROL  [initandlisten]
2019-01-24T10:26:02.198+0530 I CONTROL  [initandlisten] ** WARNING: This server is bound to localhost.
2019-01-24T10:26:02.198+0530 I CONTROL  [initandlisten] **          Remote systems will be unable to connec
2019-01-24T10:26:02.198+0530 I CONTROL  [initandlisten] **          Start the server with --bind_ip <addres
2019-01-24T10:26:02.198+0530 I CONTROL  [initandlisten] **          addresses it should serve responses fro
2019-01-24T10:26:02.198+0530 I CONTROL  [initandlisten] **          bind to all interfaces. If this behavio
2019-01-24T10:26:02.198+0530 I CONTROL  [initandlisten] **          server with --bind_ip 127.0.0.1 to disa
2019-01-24T10:26:02.198+0530 I CONTROL  [initandlisten]

C:\Program Files\MongoDB\Server\4.0\bin>mongo --host 127.0.0.1:27018
MongoDB shell version v4.0.2
connecting to: mongodb://127.0.0.1:27018/
MongoDB server version: 4.0.2
Server has startup warnings:
2019-01-24T10:39:24.775+0530 I CONTROL  [initandlisten]
2019-01-24T10:39:24.775+0530 I CONTROL  [initandlisten] ** WARNING: Access control is not enabled for the database.
2019-01-24T10:39:24.775+0530 I CONTROL  [initandlisten] **          Read and write access to data and configuration is unrestricted.
2019-01-24T10:39:24.775+0530 I CONTROL  [initandlisten]
2019-01-24T10:39:24.776+0530 I CONTROL  [initandlisten] ** WARNING: This server is bound to localhost.
2019-01-24T10:39:24.776+0530 I CONTROL  [initandlisten] **          Remote systems will be unable to connect to this server.
2019-01-24T10:39:24.776+0530 I CONTROL  [initandlisten] **          Start the server with --bind_ip <address> to specify which IP
2019-01-24T10:39:24.777+0530 I CONTROL  [initandlisten] **          addresses it should serve responses from, or with --bind_ip_all to
2019-01-24T10:39:24.777+0530 I CONTROL  [initandlisten] **          bind to all interfaces. If this behavior is desired, start the
2019-01-24T10:39:24.777+0530 I CONTROL  [initandlisten] **          server with --bind_ip 127.0.0.1 to disable this warning.
2019-01-24T10:39:24.778+0530 I CONTROL  [initandlisten]
MongoDB Enterprise test:SECONDARY>


C:\Program Files\MongoDB\Server\4.0\bin>mongo --host 127.0.0.1:27019
MongoDB shell version v4.0.2
connecting to: mongodb://127.0.0.1:27019/
MongoDB server version: 4.0.2
Server has startup warnings:
2019-01-30T12:06:55.398+0530 I CONTROL  [initandlisten]
2019-01-30T12:06:55.398+0530 I CONTROL  [initandlisten] ** WARNING: Access control is not enabled for the database.
2019-01-30T12:06:55.398+0530 I CONTROL  [initandlisten] **          Read and write access to data and configuration is unrestricted.
2019-01-30T12:06:55.399+0530 I CONTROL  [initandlisten]
2019-01-30T12:06:55.399+0530 I CONTROL  [initandlisten] ** WARNING: This server is bound to localhost.
2019-01-30T12:06:55.399+0530 I CONTROL  [initandlisten] **          Remote systems will be unable to connect to this server.
2019-01-30T12:06:55.400+0530 I CONTROL  [initandlisten] **          Start the server with --bind_ip <address> to specify which IP
2019-01-30T12:06:55.400+0530 I CONTROL  [initandlisten] **          addresses it should serve responses from, or with --bind_ip_all to
2019-01-30T12:06:55.400+0530 I CONTROL  [initandlisten] **          bind to all interfaces. If this behavior is desired, start the
2019-01-30T12:06:55.400+0530 I CONTROL  [initandlisten] **          server with --bind_ip 127.0.0.1 to disable this warning.
2019-01-30T12:06:55.401+0530 I CONTROL  [initandlisten]
MongoDB Enterprise test:SECONDARY>


MongoDB Enterprise test:PRIMARY> rs.initiate();
{
        "operationTime" : Timestamp(1548307074, 1),
        "ok" : 0,
        "errmsg" : "already initialized",
        "code" : 23,
        "codeName" : "AlreadyInitialized",
        "$clusterTime" : {
                "clusterTime" : Timestamp(1548307074, 1),
                "signature" : {
                        "hash" : BinData(0,"AAAAAAAAAAAAAAAAAAAAAAAAAAA="),
                        "keyId" : NumberLong(0)
                }
        }
}


MongoDB Enterprise test:PRIMARY> rs.add(127.0.0.1:27018);
2019-01-24T10:48:31.528+0530 E QUERY    [js] SyntaxError: missing ) after argument list @(shell):1:12
MongoDB Enterprise test:PRIMARY> rs.add("127.0.0.1:27018");
{
        "ok" : 1,
        "operationTime" : Timestamp(1548307139, 1),
        "$clusterTime" : {
                "clusterTime" : Timestamp(1548307139, 1),
                "signature" : {
                        "hash" : BinData(0,"AAAAAAAAAAAAAAAAAAAAAAAAAAA="),
                        "keyId" : NumberLong(0)
                }
        }
}

MongoDB Enterprise test:PRIMARY> rs.add(127.0.0.1:27019);

MongoDB Enterprise test:PRIMARY> rs.conf();
{
        "_id" : "test",
        "version" : 2,
        "protocolVersion" : NumberLong(1),
        "writeConcernMajorityJournalDefault" : true,
        "members" : [
                {
                        "_id" : 0,
                        "host" : "localhost:27017",
                        "arbiterOnly" : false,
                        "buildIndexes" : true,
                        "hidden" : false,
                        "priority" : 1,
                        "tags" : {

                        },
                        "slaveDelay" : NumberLong(0),
                        "votes" : 1
                },
                {
                        "_id" : 1,
                        "host" : "127.0.0.1:27018",
                        "arbiterOnly" : false,
                        "buildIndexes" : true,
                        "hidden" : false,
                        "priority" : 1,
                        "tags" : {

                        },
                        "slaveDelay" : NumberLong(0),
                        "votes" : 1
                }
        ],
        "settings" : {
                "chainingAllowed" : true,
                "heartbeatIntervalMillis" : 2000,
                "heartbeatTimeoutSecs" : 10,
                "electionTimeoutMillis" : 10000,
                "catchUpTimeoutMillis" : -1,
                "catchUpTakeoverDelayMillis" : 30000,
                "getLastErrorModes" : {

                },
                "getLastErrorDefaults" : {
                        "w" : 1,
                        "wtimeout" : 0
                },
                "replicaSetId" : ObjectId("5c416b3d712e9a0ff1ac72b7")
        }
}


MongoDB Enterprise test:PRIMARY> rs.status();
{
        "set" : "test",
        "date" : ISODate("2019-01-24T05:20:36.793Z"),
        "myState" : 1,
        "term" : NumberLong(7),
        "syncingTo" : "",
        "syncSourceHost" : "",
        "syncSourceId" : -1,
        "heartbeatIntervalMillis" : NumberLong(2000),
        "optimes" : {
                "lastCommittedOpTime" : {
                        "ts" : Timestamp(1548307234, 1),
                        "t" : NumberLong(7)
                },
                "readConcernMajorityOpTime" : {
                        "ts" : Timestamp(1548307234, 1),
                        "t" : NumberLong(7)
                },
                "appliedOpTime" : {
                        "ts" : Timestamp(1548307234, 1),
                        "t" : NumberLong(7)
                },
                "durableOpTime" : {
                        "ts" : Timestamp(1548307234, 1),
                        "t" : NumberLong(7)
                }
        },
        "lastStableCheckpointTimestamp" : Timestamp(1548307194, 1),
        "members" : [
                {
                        "_id" : 0,
                        "name" : "localhost:27017",
                        "health" : 1,
                        "state" : 1,
                        "stateStr" : "PRIMARY",
                        "uptime" : 1475,
                        "optime" : {
                                "ts" : Timestamp(1548307234, 1),
                                "t" : NumberLong(7)
                        },
                        "optimeDate" : ISODate("2019-01-24T05:20:34Z"),
                        "syncingTo" : "",
                        "syncSourceHost" : "",
                        "syncSourceId" : -1,
                        "infoMessage" : "",
                        "electionTime" : Timestamp(1548305762, 1),
                        "electionDate" : ISODate("2019-01-24T04:56:02Z"),
                        "configVersion" : 2,
                        "self" : true,
                        "lastHeartbeatMessage" : ""
                },
                {
                        "_id" : 1,
                        "name" : "127.0.0.1:27018",
                        "health" : 1,
                        "state" : 2,
                        "stateStr" : "SECONDARY",
                        "uptime" : 97,
                        "optime" : {
                                "ts" : Timestamp(1548307234, 1),
                                "t" : NumberLong(7)
                        },
                        "optimeDurable" : {
                                "ts" : Timestamp(1548307234, 1),
                                "t" : NumberLong(7)
                        },
                        "optimeDate" : ISODate("2019-01-24T05:20:34Z"),
                        "optimeDurableDate" : ISODate("2019-01-24T05:20:34Z"),
                        "lastHeartbeat" : ISODate("2019-01-24T05:20:35.574Z"),
                        "lastHeartbeatRecv" : ISODate("2019-01-24T05:20:36.616Z"),
                        "pingMs" : NumberLong(0),
                        "lastHeartbeatMessage" : "",
                        "syncingTo" : "localhost:27017",
                        "syncSourceHost" : "localhost:27017",
                        "syncSourceId" : 0,
                        "infoMessage" : "",
                        "configVersion" : 2
                }
        ],
        "ok" : 1,
        "operationTime" : Timestamp(1548307234, 1),
        "$clusterTime" : {
                "clusterTime" : Timestamp(1548307234, 1),
                "signature" : {
                        "hash" : BinData(0,"AAAAAAAAAAAAAAAAAAAAAAAAAAA="),
                        "keyId" : NumberLong(0)
                }
        }
}


MongoDB Enterprise test:PRIMARY>

MongoDB Enterprise test:PRIMARY> use exampleDB
switched to db exampleDB
MongoDB Enterprise test:PRIMARY> for (var i = 0; i <= 10; i++) db.exampleCollection.insert( { x : i } )
WriteResult({ "nInserted" : 1 })
MongoDB Enterprise test:PRIMARY> db.exampleCollection.find().pretty();
{ "_id" : ObjectId("5c494c1fa8a110e1bca27f5f"), "x" : 0 }
{ "_id" : ObjectId("5c494c1fa8a110e1bca27f60"), "x" : 1 }
{ "_id" : ObjectId("5c494c1fa8a110e1bca27f61"), "x" : 2 }
{ "_id" : ObjectId("5c494c1fa8a110e1bca27f62"), "x" : 3 }
{ "_id" : ObjectId("5c494c1fa8a110e1bca27f63"), "x" : 4 }
{ "_id" : ObjectId("5c494c1fa8a110e1bca27f64"), "x" : 5 }
{ "_id" : ObjectId("5c494c1fa8a110e1bca27f65"), "x" : 6 }
{ "_id" : ObjectId("5c494c1fa8a110e1bca27f66"), "x" : 7 }
{ "_id" : ObjectId("5c494c1fa8a110e1bca27f67"), "x" : 8 }
{ "_id" : ObjectId("5c494c1fa8a110e1bca27f68"), "x" : 9 }
{ "_id" : ObjectId("5c494c1fa8a110e1bca27f69"), "x" : 10 }
MongoDB Enterprise test:PRIMARY>


Now go to the secondary and check if the data is replicated.
MongoDB Enterprise test:SECONDARY> db.getMongo().setSlaveOk()


MongoDB Enterprise test:SECONDARY> db.exampleCollection.find().pretty();
{ "_id" : ObjectId("5c494c1fa8a110e1bca27f5f"), "x" : 0 }
{ "_id" : ObjectId("5c494c1fa8a110e1bca27f61"), "x" : 2 }
{ "_id" : ObjectId("5c494c1fa8a110e1bca27f63"), "x" : 4 }
{ "_id" : ObjectId("5c494c1fa8a110e1bca27f65"), "x" : 6 }
{ "_id" : ObjectId("5c494c1fa8a110e1bca27f62"), "x" : 3 }
{ "_id" : ObjectId("5c494c1fa8a110e1bca27f67"), "x" : 8 }
{ "_id" : ObjectId("5c494c1fa8a110e1bca27f69"), "x" : 10 }
{ "_id" : ObjectId("5c494c1fa8a110e1bca27f64"), "x" : 5 }
{ "_id" : ObjectId("5c494c1fa8a110e1bca27f68"), "x" : 9 }
{ "_id" : ObjectId("5c494c1fa8a110e1bca27f60"), "x" : 1 }
{ "_id" : ObjectId("5c494c1fa8a110e1bca27f66"), "x" : 7 }
MongoDB Enterprise test:SECONDARY>

Check on the another secondary .


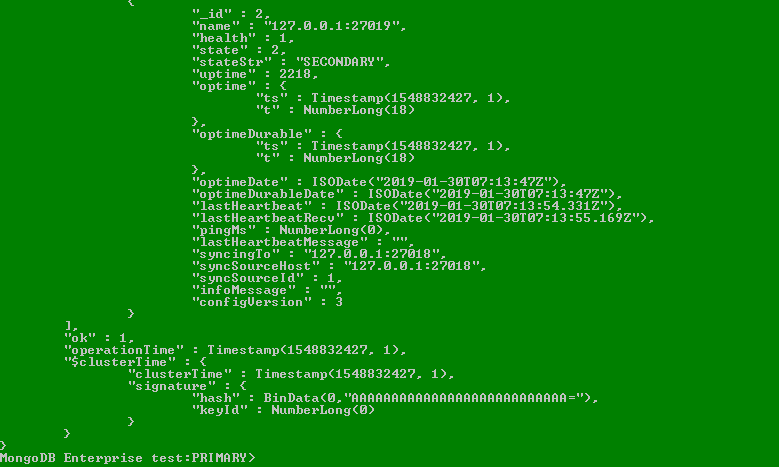
To test the fail-over lets us kill the primary now. Check the rs.status() on another secondary.


Its shows the earlier primary is not available and the one running on the 27018 becomes the primary.

Let start the 27017 again.


Monday, 21 January 2019

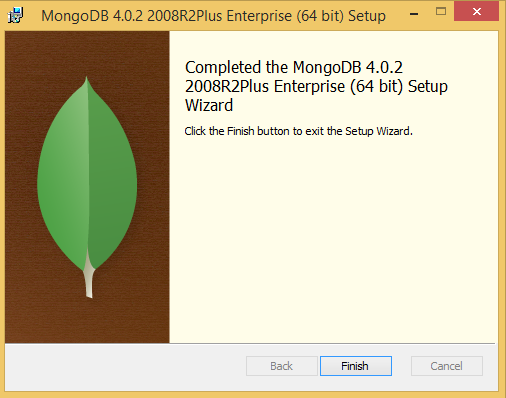
Install MongoDB 4.0 on Windows 8

1.    Now go to https://www.mongodb.com/download-center
2.    Click Download (msi) and run it.
3.    Click Next.


 4.    Accept the terms.


  5. You choose the Complete (recommended for most users)


6. Select Install MongoD as a Service.


7.  To install Compass, select Install MongoDB Compass (Default).


8. Click Install.


Run MongoDB Community Edition from the Command Interpreter

Create database directory.

From the command line
cd D:\
md “\MongoData \db”

Start your MongoDB database
To start MongoDB, run mongod.exe.
Let’s point server to your database directory.

"C:\Program Files\MongoDB\Server\4.0\bin\mongod.exe" --dbpath="c:\data\db"


If the MongoDB database server is running correctly, the Command Interpreter displays:

Connect to MongoDB.

"C:\Program Files\MongoDB\Server\4.0\bin\mongo.exe"


Monday, 31 December 2018

Achieving the Data Integrity and Incrementally Update the data on ElasticSearch Using Logstash

In order to avoid the duplication issues at elasticsearch you may need to add the unique id for the documents at elasticsearch.

Modify the logstashMSSQL_Test.conf by adding the "document_id" => "%{studentid}" in the output like below.

output {
  stdout { codec => json_lines }
  elasticsearch {
  "hosts" => "localhost:9200"
  "index" => "test-migrate"
  "document_type" => "data"
  "document_id" => "%{studentid}"
  }


Schedule the same migration if the data is continuosly been updateded on the MSSQL Sever side
This will be running after every one minute
Add the below part in order to incrementing update

schedule => "* * * * *"
statement => "SELECT * FROM Student where studentid > :sql_last_value"
use_column_value => true
tracking_column => studentid

input {
  jdbc {
    jdbc_connection_string => "jdbc:sqlserver://localhost:1433;databaseName=test"
    # The user we wish to execute our statement as
    jdbc_user => "sa"
    jdbc_password => "sasa"
    # The path to our downloaded jdbc driver
    jdbc_driver_library => "C:\Users\abhijitb\.m2\repository\com\microsoft\sqlserver\mssql-jdbc\6.2.2.jre8\mssql-jdbc-6.2.2.jre8.jar"
    jdbc_driver_class => "com.microsoft.sqlserver.jdbc.SQLServerDriver"
    # our query
#clean_run => true
schedule => "* * * * *"
    statement => "SELECT * FROM Student where studentid > :sql_last_value"
    use_column_value => true
    tracking_column => "studentid"
    }
}

output {
  #stdout { codec => json_lines }
  elasticsearch {
  "hosts" => "localhost:9200"
  "index" => "student"
  "document_type" => "data"
  "document_id" => "%{studentid}"
  }
}
 
Add the data to Table Student one by one.

INSERT INTO Student (StudentId, FirstName, LastName, Age, Sex, City, Country, EnrolledDate) VALUES
(8,'David','Bruce', 32, 'M', 'Paris', 'FRANCE', GETDATE());

INSERT INTO Student (StudentId, FirstName, LastName, Age, Sex, City, Country, EnrolledDate) VALUES
(9,'Steve','Warne', 30, 'M', 'Paris', 'FRANCE', GETDATE()-200);

INSERT INTO Student (StudentId, FirstName, LastName, Age, Sex, City, Country, EnrolledDate) VALUES
(10,'Ajit','Patil', 32, 'M', 'Pune', 'India', GETDATE()-100);

INSERT INTO Student (StudentId, FirstName, LastName, Age, Sex, City, Country, EnrolledDate) VALUES
(11,'Steve','Scot', 32, 'M', 'Paris', 'FRANCE', GETDATE()-50);


Once you update the file, go the
Go the path C:\logstash-6.5.4\logstash-6.5.4\bin> on the command prompt.
run the below command "logstash -f logstashMSSQL_Test.conf"

C:\logstash-6.5.4\logstash-6.5.4\bin>logstash -f logstashMSSQL_Test.conf


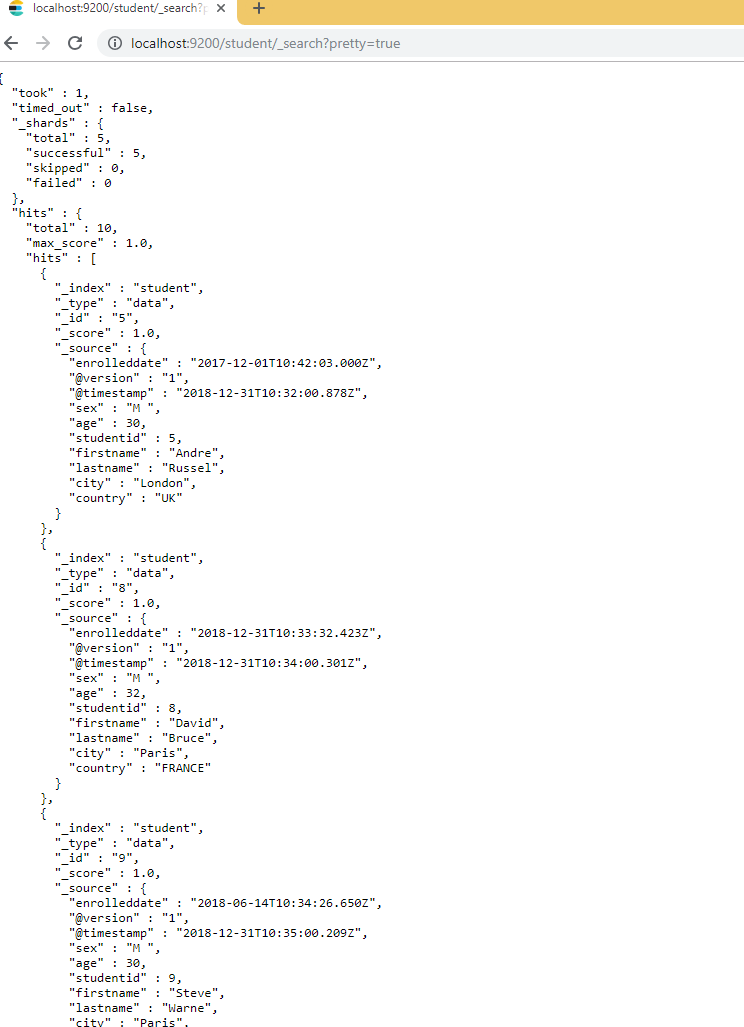
To verify the Data on the ElasticSeach side click the link on the browser.
http://localhost:9200/student/_search?pretty=true


Check the data in descending order. You can verify the when the data is added to elastic search by checking the timestamp of it.
http://localhost:9200/student/_search?q=*&sort=studentid:desc&pretty=true


To check more properties visit https://www.elastic.co/guide/en/logstash/current/plugins-inputs-jdbc.html

Example of Migrating the MSSQL Data to ElasticSearch using the Logstash.

Example of MSSQL SERVER DATABASE + LogStash + Elastic Search

Step 1 :

I assume the MSSQL server database is installed.

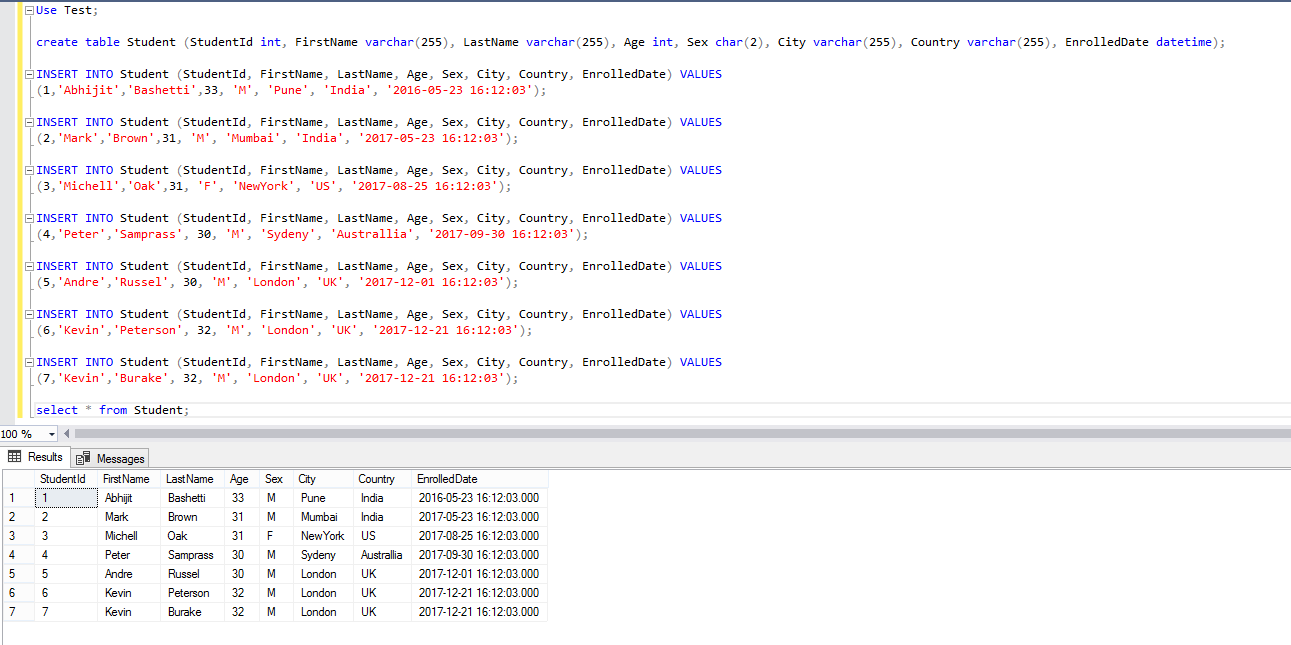
Let create a table and insert some data to it.

Use Test;

create table Student (StudentId int, FirstName varchar(255), LastName varchar(255), Age int, Sex char(2), City varchar(255), Country varchar(255), EnrolledDate datetime);

INSERT INTO Student (StudentId, FirstName, LastName, Age, Sex, City, Country, EnrolledDate) VALUES
(1,'Abhijit','Bashetti',33, 'M', 'Pune', 'India', '2016-05-23 16:12:03');

INSERT INTO Student (StudentId, FirstName, LastName, Age, Sex, City, Country, EnrolledDate) VALUES
(2,'Mark','Brown',31, 'M', 'Mumbai', 'India', '2017-05-23 16:12:03');

INSERT INTO Student (StudentId, FirstName, LastName, Age, Sex, City, Country, EnrolledDate) VALUES
(3,'Michell','Oak',31, 'F', 'NewYork', 'US', '2017-08-25 16:12:03');

INSERT INTO Student (StudentId, FirstName, LastName, Age, Sex, City, Country, EnrolledDate) VALUES
(4,'Peter','Samprass', 30, 'M', 'Sydeny', 'Australlia', '2017-09-30 16:12:03');

INSERT INTO Student (StudentId, FirstName, LastName, Age, Sex, City, Country, EnrolledDate) VALUES
(5,'Andre','Russel', 30, 'M', 'London', 'UK', '2017-12-01 16:12:03');

INSERT INTO Student (StudentId, FirstName, LastName, Age, Sex, City, Country, EnrolledDate) VALUES
(6,'Kevin','Peterson', 32, 'M', 'London', 'UK', '2017-12-21 16:12:03');

INSERT INTO Student (StudentId, FirstName, LastName, Age, Sex, City, Country, EnrolledDate) VALUES
(7,'Kevin','Burake', 32, 'M', 'London', 'UK', '2017-12-21 16:12:03');

select * from Student;


Step 2 :

Now Install the elastic search by downloading the same from https://www.elastic.co/downloads/elasticsearch

Go to the installed path like "C:\Program Files\Elastic\Elasticsearch\6.5.3\bin". and start the elastic search.


Step 3 :

Now Download the Logstash. https://www.elastic.co/downloads/logstash

Go to the path C:\logstash-6.5.4\logstash-6.5.4\config

Copy the logstash-sample.conf for the MSSQL DATABASE.
Rename it to logstashMSSQL_Test.conf.

Add below properties.

input {
  jdbc {
# the full url string for the mssql server
    jdbc_connection_string => "jdbc:sqlserver://localhost:1433;databaseName=test"
    # The username and password to execute our statement as
    jdbc_user => "sa"
    jdbc_password => "sasa"
    # The path to our downloaded mssql jdbc driver
    jdbc_driver_library => "C:\Users\abhijitb\.m2\repository\com\microsoft\sqlserver\mssql-jdbc\6.2.2.jre8\mssql-jdbc-6.2.2.jre8.jar"
    jdbc_driver_class => "com.microsoft.sqlserver.jdbc.SQLServerDriver"
    # The required query
statement => "select * from Student"
    }
}

output {
  #stdout { codec => json_lines }
  elasticsearch {
  "hosts" => "localhost:9200"
  "index" => "student"
  "document_type" => "data"
  }
}


Go the path C:\logstash-6.5.4\logstash-6.5.4\bin> on the command prompt.
run the below command "logstash -f logstashMSSQL_Test.conf"

C:\logstash-6.5.4\logstash-6.5.4\bin>logstash -f logstashMSSQL_Test.conf


Step 4 :

Its time to verify if the data is migrated to elasticsearch.

If you have windows git go to the path "C:\Program Files\Git\mingw64\bin>"
and execute the command curl -XPOST "localhost:9200/student/_search?pretty=true"
C:\Program Files\Git\mingw64\bin>curl -XPOST "localhost:9200/student/_search?pretty=true"


or go to the browser and type http://localhost:9200/student/_search?pretty=true


Sunday, 30 December 2018

Indexing and searching to ElasticSearch by Curl

I have listed down the curl request for indexing the data on ElasticSearch and curl request for searching the data on ElasticSearch.

I am using the Curl provided by the Git. You may need to install Window Git in order to use the same. Once you install Windows GIT. Go to the path cd C:\Program Files\Git\mingw64\bin>


1. To create an index named "customer"

curl -X PUT "localhost:9200/customer?pretty"

Response is :

{
  "acknowledged" : true,
  "shards_acknowledged" : true,
  "index" : "customer"
}

2. To list all the indices availabale

curl -X GET "localhost:9200/_cat/indices?v"

3.  To add a document

curl -X PUT "localhost:9200/customer/_doc/1?pretty" -H "Content-Type: application/json" -d "{\"name\": \"John Doe\"}"

4. To view a specific document

curl -X GET "localhost:9200/customer/_doc/1?pretty"

5. To delete a index

curl -X DELETE "localhost:9200/customer?pretty"
curl -X GET "localhost:9200/_cat/indices?v"

6. To Update a document

curl -X POST "localhost:9200/customer/_doc/1/_update?pretty" -H "Content-Type: application/json" -d "{\"doc\": { \"name\": \"Jane Doe\" }}"

7. To Delete a document

curl -X DELETE "localhost:9200/customer/_doc/1?pretty"

To verift run the below command
curl -X GET "localhost:9200/customer/_doc/1?pretty"

C:\Program Files\Git\mingw64\bin>curl -X GET "localhost:9200/customer/_doc/1?pretty"
{
  "_index" : "customer",
  "_type" : "_doc",
  "_id" : "1",
  "found" : false
}

8. Buld adding documents

curl -H "Content-Type: application/json" -XPOST "localhost:9200/bank/_doc/_bulk?pretty&refresh" --data-binary "@accounts.json"

Check if the index named bank is created
curl "localhost:9200/_cat/indices?v"

9. Search all the document in ascending order

curl -X GET "localhost:9200/bank/_search?q=*&sort=account_number:asc&pretty"

OR

curl -X GET "localhost:9200/bank/_search?pretty" -H "Content-Type: application/json" -d "{\"query\": { \"match_all\": {} }, \"sort\": [{ \"account_number\": \"asc\" }]}"


10. Search document by mentioning the limit

curl -X GET "localhost:9200/bank/_search?pretty" -H "Content-Type: application/json" -d "{\"query\": { \"match_all\": {} }, \"size\": 1 }"

11. Search Document in sorting order

curl -X GET "localhost:9200/bank/_search?pretty" -H "Content-Type: application/json" -d "{\"query\": {\"match_all\": {} }, \"sort\": {\"balance\": { \"order\": \"desc\" } }}"


12. Search all and return data of specific fields

curl -X GET "localhost:9200/bank/_search?pretty" -H "Content-Type: application/json" -d "{\"query\": { \"match_all\": {} }, \"_source\": [\"account_number\", \"balance\"]}"

13. Search for specific document by applying criteria

curl -X GET "localhost:9200/bank/_search?pretty" -H "Content-Type: application/json" -d "{\"query\": { \"match\": { \"account_number\": 20 } }}"
curl -X GET "localhost:9200/bank/_search?pretty" -H "Content-Type: application/json" -d "{\"query\": { \"match\": { \"address\": \"mill\" } }}"

14. Search for specific document by applying AND criteria with Bool with must

curl -X GET "localhost:9200/bank/_search?pretty" -H "Content-Type: application/json" -d "{\"query\": { \"bool\": { \"must\": [{ \"match\": { \"address\": \"mill\" } },{ \"match\": { \"address\": \"lane\" } }]}}}"

15. Search for specific document by applying OR criteria with Bool with should

curl -X GET "localhost:9200/bank/_search?pretty" -H "Content-Type: application/json" -d "{\"query\": { \"bool\": { \"should\": [ { \"match\": { \"address\": \"mill\" } }, { \"match\": { \"address\": \"lane\" } }]}}}"

16. Search for specific document by applying AND & NOT criteria with Bool with should

curl -X GET "localhost:9200/bank/_search?pretty" -H "Content-Type: application/json" -d "{ \"query\": { \"bool\": { \"must\": [{ \"match\": { \"age\": \"40\" } }], \"must_not\": [{ \"match\": { \"state\": \"ID\" } }]}}}"

17. Search Documents by applying some filter like greater than , lesser than to it.

curl -X GET "localhost:9200/bank/_search?pretty" -H "Content-Type:application/json" -d "{ \"query\": { \"bool\": { \"must\": { \"match_all\": {} }, \"filter\": { \"range\": { \"balance\": {\"gte\": 20000, \"lte\": 30000}}}}}}"

18. Search Document by some aggregations

curl -X GET "localhost:9200/bank/_search?pretty" -H "Content-Type:application/json" -d "{ \"size\": 0, \"aggs\": { \"group_by_state\": { \"terms\": { \"field\": \"state.keyword\"}}}}"

Sunday, 9 December 2018

Generate the Boilerplate code using Lombok


All the time while doing the programming we do the same thing again and again.The same code is been added by us or we use eclispe to generate the same code. This code is called as boilerplate code. Its the time to get rid of such things. There is a magic available for the same which is called as lombok. Yes, its lombok library which helps you to remove the boilerplate code and also provides some others features. If Lombok is added to your project classpath, you can can easily get rid of all the getters & setters methods, class constructors(argument constructor, no argument constructor), hashcode and equals methods and many more by just adding couple of annotations the class. For more details and other feature please refer https://projectlombok.org/features/all. The guys have created a very nice thing.

I will list down all the annotation provided by the lombok and will see some them with the examples.

@Getter/@Setter : It will generate the getter and setter methods of the class fields. All the methods genearated are by default public. You can set the access level for any field.

@NonNull : Can be used for the parameters of a methos or a constructors for null check. It can be applied to a field as well.

@NoArgsConstructor : It generates constructor with no parameters.

@RequiredArgsConstructor : It generates a constructor with one parameter of each field where it requires special handling.

@AllArgsConstructor : It generates a constructor with 1 parameter for each field in your class.

@ToString : It provides the implementation of toString method to your class where it will print the classs name and the fields of the class.

@EqualsAndHashCode : Same as toString , Lombok provides the implemenation of the equals and hashCode method. It will consider the non-static and non-transient fields. You can also incluse or exclude the fields explicitely @EqualsAndHashCode.Include or @EqualsAndHashCode.Exclude.

@Data : Its combo provided by lombok for some the commonly used annotation. Its combo of
@ToString, @EqualsAndHashCode, @Getter / @Setter and @RequiredArgsConstructor. It covers all of the above in one shot.

Here is an example where I have created a java class named Employee.java
I have added the member as empId,firstName,lastName,address
On the right side, in the outline window you can find all the code generated by lombok.


I have created the object of Employee class and shown how to use the implementation provided by lombok. In this case I have used the toString and equals method.


Saturday, 1 December 2018

Split the large xml into smaller xml using xslt.

Split the large xml to smaller xml using XSLT.

Here is sample of source xml.

<?xml version="1.0" encoding="UTF-8"?>
<ABC>
    <END />
    <Tables>
        <START>
            <row>
                <id>111</id>
                <name>abc</name>
                <deptId>1</deptId>
            </row>
            <row>
                <id>112</id>
                <name>abc1</name>
                <deptId>1</deptId>
            </row>
            <row>
                <id>113</id>
                <name>abc3</name>
                <deptId>1</deptId>
            </row>
            <row>
                <id>222</id>
                <name>def</name>
                <deptId>2</deptId>
            </row>
            <row>
                <id>333</id>
                <name>pqr</name>
                <deptId>2</deptId>
            </row>
            <row>
                <id>444</id>
                <name>xyz</name>
                <deptId>2</deptId>
            </row>
            <row>
                <id>555</id>
                <name>lmn</name>
                <deptId>3</deptId>
            </row>
            <row>
                <id>555</id>
                <name>lmn</name>
                <deptId>3</deptId>
            </row>
        </START>
    </Tables>
</ABC>

I have a xml with the above structure.
I have to spilt the xml into 3 xml's based on the different deptId.
I have to Split the xml into smaller one based on change in tag values.
My elemement is deptId whose values is been changed after some rows.
The all elements with same deptId are in a sequence.

The required output is : Its good to have the xml name as the department id.
The first xml be with name 1.xml :

<?xml version="1.0" encoding="UTF-16"?>
<ABC>
    <END />
    <Tables>
        <START>
            <row>
                <id>111</id>
                <name>abc</name>
                <deptId>1</deptId>
            </row>
            <row>
                <id>112</id>
                <name>abc1</name>
                <deptId>1</deptId>
            </row>
            <row>
                <id>113</id>
                <name>abc3</name>
                <deptId>1</deptId>
            </row>
        </START>
    </Tables>
</ABC>

The solution to the above the problem is to use the XSLT.
Create a xsl file like below.

<xsl:transform xmlns:xsl="http://www.w3.org/1999/XSL/Transform" version="2.0">
  <xsl:template match="/">
    <xsl:for-each-group select="//ABC//Tables//START//row" group-adjacent="deptId">
    <xsl:variable name="file" select="concat(deptId,'.xml')"/>
      <xsl:result-document href="{$file}">
        <ABC>
         <END />
          <Tables>
           <START>
            <xsl:copy-of select="current-group()"/>
           </START>
          </Tables>
        </ABC>
      </xsl:result-document>
    </xsl:for-each-group>
  </xsl:template>
</xsl:transform>


Here is the sample piece of java code that need to run.

package com.java.xml;

import java.io.File;

import javax.xml.transform.stream.StreamSource;

import net.sf.saxon.s9api.Processor;
import net.sf.saxon.s9api.SaxonApiException;
import net.sf.saxon.s9api.Serializer;
import net.sf.saxon.s9api.Xslt30Transformer;
import net.sf.saxon.s9api.XsltCompiler;
import net.sf.saxon.s9api.XsltExecutable;

public class SplitXml {

public static void main(String[] args) {
Processor proc = new Processor(false);
XsltCompiler comp = proc.newXsltCompiler();
XsltExecutable exp;
try {
exp = comp.compile(new StreamSource(new File("E://test.xsl")));
Serializer out = proc.newSerializer(new File("E://output.xml"));
Xslt30Transformer trans = exp.load30();
trans.applyTemplates(new StreamSource(new File("E://source.xml")),
out);
} catch (SaxonApiException e) {
e.printStackTrace();
}
}
}

Monday, 27 February 2017

Steps for Solr 6.1 setup with data import handler(DIH)

1. Install Java Runtime Environment (JRE) version 1.8 for Solr 6.1

2. Set Java home "export JAVA_HOME=/usr/lib/jvm/jdk1.8.0_101/"

2. Download solr 6.1 "solr-6.1.0.tgz" from http://www-eu.apache.org/dist/lucene/solr/6.1.0/

3. Extract tgz file using "tar zxf solr-6.1.0.tgz".

4. Open the port 8983 as to communicate with solr.

5. Go to the path ../solr-6.1.0/ and start the server with "bin/solr start"

============================================================================================================================================================

1. Create a config folder named myConfig under configsets directory , move the conf folder into it. Add the data-config.xml into "/myConfig/conf".

2. Fire the url to create the core.

http://localhost:8983/solr/admin/cores?action=CREATE&name=25406&instanceDir=/home/abhijit/Downloads/solr-6.1.0/server/solr/25406/&configSet=myConfig

3. Add the jars "solr-dataimporthandler-6.1.0.jar", "solr-dataimporthandler-extras-6.1.0.jar" to path "/home/abhijit/Downloads/solr-6.1.0/server/lib".

4. Add the "solr-core-6.1.0.jar" jar to the path "/home/abhijit/Downloads/solr-6.1.0/server/lib".

5. Add the "solr-solrj-6.1.0.jar" jar to the path "/home/abhijit/Downloads/solr-6.1.0/server/lib".

6. If you do the above steps you will get the error like :

   "Error Instantiating requestHandler, org.apache.solr.handler.dataimport.DataImportHandler failed to instantiate org.apache.solr.request.SolrRequestHandler"
    This problem occurred because dataimporthandler and requesthandler are loaded by two different class loaders. To solve it, ensure that solr loads its jars only from the same class loader.  

   Option to steps 3,4,5 create a folder lib inside the solr folder at path "/home/abhijit/Downloads/solr-6.1.0/server/solr"
   and add the entry of the same to solrConfig.xml as "<lib dir="./solr/lib" />".
   Comment the other lib entries from solrConfig.xml
   the jars "solr-dataimporthandler-6.1.0.jar", "solr-dataimporthandler-extras-6.1.0.jar" to path "/home/abhijit/Downloads/solr-6.1.0/server/solr/lib".

9. Commented the updateRequestProcessorChain in solrConfig.xml.

10. HttpSolrCall null:org.apache.solr.handler.dataimport.DataImportHandlerException: Data Config problem: Entity must have a name.
    Every entity defined in data-config file must have a name defined to it e.g. "<entity name="tika" , "<entity name="customProperty"

11. Error : "java.lang.NoClassDefFoundError: org/apache/tika/parser/Parser"
    Add the jar "tika-core-1.7.jar" to path "/home/abhijit/Downloads/solr-6.1.0/server/solr/lib".

12. Copy all the jars from "/Downloads/solr-6.1.0/contrib/extraction/lib" to path "/home/abhijit/Downloads/solr-6.1.0/server/solr/lib".

13. Error : " java.sql.SQLSyntaxErrorException: ORA-00907: missing right parenthesis"
    " ' " is missing for the date parameter passed while the full import e.g '24/05/2015'

14. Command for full import

http://localhost:8983/solr/mycore/dataimport?command=full-import&clean=true&commit=true

15. Check core status

http://localhost:8983/solr/admin/cores?action=STATUS&core=25406

16. Delete URL was not working so added the solrConfig.xml file.

  http://10.55.36.19:8983/solr/25406/update?stream.body=<delete><id>25473</id></delete>&commit=true

  <requestHandler name="/update" class="solr.UpdateRequestHandler">
   <lst name="defaults">
      <str name="update.chain">id</str>
   </lst>
  </requestHandler>

   "o.a.s.h.RequestHandlerBase org.apache.solr.common.SolrException: unknown UpdateRequestProcessorChain: add-unknown-fields-to-the-schema"
 
   Uncommentted the "updateRequestProcessorChain" in solrConfig.xml and named it as name="id".

Sunday, 26 February 2017

Change in the default port of Jetty for Solr.

Change in the default port of Jetty for Solr.

   Currently Jetty uses 8983 as default port. 

   I wanted to change it to 8080 port.

    To achieve the same I have done the changes at the following places.

     1. Change in the file solr.xml located at ../solr-6.1.0/server/solr/.
        
        Change from  
        
        <int name="hostPort">${jetty.port:8983}</int>
       
        to

        <int name="hostPort">${jetty.port:8080}</int>


   2. Change in the file solr.in.sh located at ../solr-6.1.0/bin/
        
       Change from 
       
       # Sets the port Solr binds to, default is 8983
        SOLR_PORT=8983

        to 

        # Sets the port Solr binds to, default is 8983
        SOLR_PORT=8080

Tuesday, 12 April 2016

Sqoop Learning...

Sqoop is a tool designed to transfer data between Hadoop and relational databases. You can use Sqoop to import data from a relational database management system (RDBMS) such as MySQL or Oracle into the Hadoop Distributed File System (HDFS), transform the data in Hadoop MapReduce, and then export the data back into an RDBMS.

With Sqoop, you can import data from a relational database system into HDFS. The input to the import process is a database table. Sqoop will read the table row-by-row into HDFS. The output of this import process is a set of files containing a copy of the imported table. The import process is performed in parallel. For this reason, the output will be in multiple files. These files may be delimited text files (for example, with commas or tabs separating each field), or binary Avro or SequenceFiles containing serialized record data.

A by-product of the import process is a generated Java class which can encapsulate one row of the imported table. This class is used during the import process by Sqoop itself. The Java source code for this class is also provided to you, for use in subsequent MapReduce processing of the data. This class can serialize and deserialize data to and from the SequenceFile format.

Sqoop includes some other commands which allow you to inspect the database you are working with.
For example,
1.list the available database schemas (with the sqoop-list-databases tool).

sqoop-list-databases --connect jdbc:mysql://localhost:3306/ --username root --password hr;

2.List the available tables within a schema (with the sqoop-list-tables tool).

sqoop-list-tables --connect jdbc:mysql://localhost:3306/vaibhav --username root --password hr;

3.Sqoop also includes a primitive SQL execution shell (the sqoop-eval tool).

sqoop eval --connect jdbc:mysql://localhost:3306/vaibhav --username root --password hr --query "select * from employees";

Most aspects of the import, code generation, and export processes can be customized. You can control the specific row range or columns imported. You can specify particular delimiters and escape characters for the file-based representation of the data, as well as the file format used. You can also control the class or package names used in generated code.


Sqoop ships with a help tool. To display a list of all available tools, type the following command:

$ sqoop help

usage: sqoop COMMAND [ARGS]

Available commands:
  codegen            Generate code to interact with database records
  create-hive-table  Import a table definition into Hive
  eval               Evaluate a SQL statement and display the results
  export             Export an HDFS directory to a database table
  help               List available commands
  import             Import a table from a database to HDFS
  import-all-tables  Import tables from a database to HDFS
  job                Work with saved jobs
  list-databases     List available databases on a server
  list-tables        List available tables in a database
  merge              Merge results of incremental imports
  metastore          Run a standalone Sqoop metastore
  version            Display version information


To display help for a specific tool by entering: sqoop help (tool-name);
for example,

$ sqoop help import.


usage: sqoop import [GENERIC-ARGS] [TOOL-ARGS]

Common arguments:
   --connect <jdbc-uri>                         Specify JDBC connect String

   --connection-manager <class-name>            Specify connection manager class name

   --connection-param-file <properties-file>    Specify connection parameters file

   --driver <class-name>                        Manually specify JDBC driver class to use

   --hadoop-home <hdir>                         Override $HADOOP_MAPRED_HOME_ARG

   --hadoop-mapred-home <dir>                   Override $HADOOP_MAPRED_HOME_ARG

   --password <password>                        Set authentication password

   --password-file <password-file>              Set authentication password file path

   --username <username>                        Set authentication username


Options Files to Pass Arguments

sqoop import --connect jdbc:mysql://localhost/db --username root --table TEST

$ sqoop --options-file /users/homer/work/import.txt --table TEST

where the options file /users/homer/work/import.txt contains the following:

import
--connect
jdbc:mysql://localhost/db
--username
root

The options file can have empty lines and comments for readability purposes. Comments within option files that begin with the hash character.


sqoop-import : The import tool imports an individual table from an RDBMS to HDFS.

Table 1. Common arguments
Argument Description
--connect <jdbc-uri> Specify JDBC connect string
--connection-manager <class-name> Specify connection manager class to use
--driver <class-name> Manually specify JDBC driver class to use
--hadoop-mapred-home <dir> Override $HADOOP_MAPRED_HOME
--help Print usage instructions
--password-file Set path for a file containing the authentication password
-P Read password from console
--password <password> Set authentication password
--username <username> Set authentication username
--verbose Print more information while working
--connection-param-file <filename> Optional properties file that provides connection parameters


Table 2. Import control arguments:

Argument Description
--append Append data to an existing dataset in HDFS
--as-avrodatafile Imports data to Avro Data Files
--as-sequencefile Imports data to SequenceFiles
--as-textfile Imports data as plain text (default)
--boundary-query <statement> Boundary query to use for creating splits
--columns <col,col,col…> Columns to import from table
--delete-target-dir Delete the import target directory if it exists
--direct Use direct import fast path
--direct-split-size <n> Split the input stream every n bytes when importing in direct mode
--fetch-size <n> Number of entries to read from database at once.
--inline-lob-limit <n> Set the maximum size for an inline LOB
-m,--num-mappers <n> Use n map tasks to import in parallel
-e,--query <statement> Import the results of statement.
--split-by <column-name> Column of the table used to split work units
--table <table-name> Table to read
--target-dir <dir> HDFS destination dir
--warehouse-dir <dir> HDFS parent for table destination
--where <where clause> WHERE clause to use during import
-z,--compress Enable compression
--compression-codec <c> Use Hadoop codec (default gzip)
--null-string <null-string> The string to be written for a null value for string columns
--null-non-string <null-string> The string to be written for a null value for non-string columns


Selecting the Data to Import
--table : argument to select the table to import
--columns : argument to select a subset of columns and control their ordering
--where : control which rows are imported by adding a SQL WHERE clause to the import statement
--query : Instead of using the --table, --columns and --where arguments, you can specify a SQL statement with the --query argument.

$CONDITIONS :
If you want to import the results of a query in parallel, then each map task will need to execute a copy of the query, with results partitioned by bounding conditions inferred by Sqoop. Your query must include the token $CONDITIONS which each Sqoop process will replace with a unique condition expression. You must also select a splitting column with --split-by.

the query can be executed once and imported serially, by specifying a single map task with -m 1:

-m : Sqoop imports data in parallel from most database sources. You can specify the number of map tasks (parallel processes) to use to perform the import by using the -m or --num-mappers argument.
When performing parallel imports, Sqoop needs a criterion by which it can split the workload. Sqoop uses a splitting column to split the workload. By default, Sqoop will identify the primary key column (if present) in a table and use it as the splitting column.

--warehouse-dir : By default, Sqoop will import a table named foo to a directory named foo inside your home directory in HDFS. For example, if your username is someuser, then the import tool will write to /user/someuser/foo/(files). You can adjust the parent directory of the import with the --warehouse-dir argument.

Incremental Imports : Incremental import mode which can be used to retrieve only rows newer than some previously-imported set of rows.
--check-column (col) Specifies the column to be examined when determining which rows to import. (the column should not be of type CHAR/NCHAR/VARCHAR/VARNCHAR/ LONGVARCHAR/LONGNVARCHAR)
--incremental (mode) Specifies how Sqoop determines which rows are new. Legal values for mode include append and lastmodified.
--last-value (value) Specifies the maximum value of the check column from the previous import.

File Formats : two file formats: delimited text or SequenceFiles.
1.Delimited text is the default import format. You can also specify it explicitly by using the --as-textfile argument.
2.SequenceFiles are a binary format that store individual records in custom record-specific data types.
3.Avro data files are a compact, efficient binary format that provides interoperability with applications written in other programming languages. Avro also supports versioning, so that when, e.g., columns are added or removed from a table, previously imported data files can be processed along with new ones.


-z or --compress : compress your data by using the deflate (gzip) algorithm with the -z or --compress argument,


Examples :

1. basic import of a table named employees

 sqoop import --connect jdbc:mysql://localhost:3306/vaibhav --username root --password hr --table employees;

2. basic import requiring a login:

sqoop import --connect jdbc:mysql://localhost:3306/vaibhav --username root -P --table employees;

3. Selecting specific columns from the EMPLOYEES table

sqoop import --connect jdbc:mysql://localhost:3306/vaibhav --username root --password hr --table employees --columns "employee_id, first_name, last_name";

4. Controlling the import parallelism (using 8 parallel tasks):

sqoop import --connect jdbc:mysql://localhost:3306/vaibhav --username root --password hr --table employees --columns "employee_id, first_name, last_name" -m 8;

5. Specifying the delimiters to use in a text-mode import:

sqoop import --connect jdbc:mysql://localhost:3306/vaibhav --username root --password hr --table employees --columns "employee_id, first_name, last_name" --fields-terminated-by '\t' --lines-terminated-by '\n' --optionally-enclosed-by '\"';

6. importing data to a target directory "/abhijit"

sqoop import --connect jdbc:mysql://localhost:3306/vaibhav --username root --password hr --table employees --columns "employee_id, first_name, last_name" --target-dir /abhijit;

7. Import subset of data.
sqoop import --connect jdbc:mysql://localhost:3306/vaibhav --username root --password hr --table employees --where 'salary>10000' --target-dir /abhijit/subset;

8. Import Subset with specific columns

sqoop import --connect jdbc:mysql://localhost:3306/vaibhav --username root --password hr --table employees --where 'salary>10000' --columns "employee_id, first_name, last_name" --target-dir /abhijit/subset;

9. IMport Subset with Specifying the delimiters

sqoop import --connect jdbc:mysql://localhost:3306/vaibhav --username root --password hr --table employees --where 'salary>10000' --target-dir /abhijit/subset/terminated --fields-terminated-by '\t' --lines-terminated-by '\n';

10. An incremental import of new data

sqoop import --connect jdbc:mysql://localhost:3306/vaibhav --username root --password hr --table employees --check-column employee_id --incremental append --last-value 208;

11. Import to sequenceFile format

sqoop import --connect jdbc:mysql://localhost:3306/vaibhav --username root --password hr --table employees --where 'salary>10000' --target-dir /abhijit/subset/sequenceFile --as-sequencefile;

12. Import to avrodatafile format

sqoop import --connect jdbc:mysql://localhost:3306/vaibhav --username root --password hr --table employees --where 'salary>10000' --target-dir /abhijit/subset/avroFile --as-avrodatafile;


12. sqoop-import-all-tables
The import-all-tables tool imports a set of tables from an RDBMS to HDFS. Data from each table is stored in a separate directory in HDFS.
For the import-all-tables tool to be useful, the following conditions must be met:

    Each table must have a single-column primary key.
    You must intend to import all columns of each table.
    You must not intend to use non-default splitting column, nor impose any conditions via a WHERE clause.

===============================================================================================================================

Importing Data Into Hive

Argument Description
--hive-home <dir> Override $HIVE_HOME
--hive-import Import tables into Hive (Uses Hive’s default delimiters if none are set.)
--hive-overwrite Overwrite existing data in the Hive table.
--create-hive-table If set, then the job will fail if the target hive
table exits. By default this property is false.

--hive-table <table-name> Sets the table name to use when importing to Hive.
--hive-drop-import-delims Drops \n, \r, and \01 from string fields when importing to Hive.
--hive-delims-replacement Replace \n, \r, and \01 from string fields with user defined string when importing to Hive.
--hive-partition-key Name of a hive field to partition are sharded on
--hive-partition-value <v> String-value that serves as partition key for this imported into hive in this job.
--map-column-hive <map> Override default mapping from SQL type to Hive type for configured columns.


Sqoop will by default import NULL values as string null. Hive is however using string \N to denote NULL values and therefore predicates dealing with NULL (like IS NULL) will not work correctly. You should append parameters --null-string and --null-non-string in case of import job or --input-null-string and --input-null-non-string in case of an export job if you wish to properly preserve NULL values.

Hive can put data into partitions for more efficient query performance. You can tell a Sqoop job to import data for Hive into a particular partition by specifying the --hive-partition-key and --hive-partition-value arguments. The partition value must be a string.