Monday 31 December 2018

Achieving the Data Integrity and Incrementally Update the data on ElasticSearch Using Logstash

In order to avoid the duplication issues at elasticsearch you may need to add the unique id for the documents at elasticsearch.

Modify the logstashMSSQL_Test.conf by adding the "document_id" => "%{studentid}" in the output like below.

output {
  stdout { codec => json_lines }
  elasticsearch {
  "hosts" => "localhost:9200"
  "index" => "test-migrate"
  "document_type" => "data"
  "document_id" => "%{studentid}"
  }


Schedule the same migration if the data is continuosly been updateded on the MSSQL Sever side
This will be running after every one minute
Add the below part in order to incrementing update

schedule => "* * * * *"
statement => "SELECT * FROM Student where studentid > :sql_last_value"
use_column_value => true
tracking_column => studentid

input {
  jdbc {
    jdbc_connection_string => "jdbc:sqlserver://localhost:1433;databaseName=test"
    # The user we wish to execute our statement as
    jdbc_user => "sa"
    jdbc_password => "sasa"
    # The path to our downloaded jdbc driver
    jdbc_driver_library => "C:\Users\abhijitb\.m2\repository\com\microsoft\sqlserver\mssql-jdbc\6.2.2.jre8\mssql-jdbc-6.2.2.jre8.jar"
    jdbc_driver_class => "com.microsoft.sqlserver.jdbc.SQLServerDriver"
    # our query
#clean_run => true
schedule => "* * * * *"
    statement => "SELECT * FROM Student where studentid > :sql_last_value"
    use_column_value => true
    tracking_column => "studentid"
    }
}

output {
  #stdout { codec => json_lines }
  elasticsearch {
  "hosts" => "localhost:9200"
  "index" => "student"
  "document_type" => "data"
  "document_id" => "%{studentid}"
  }
}
 
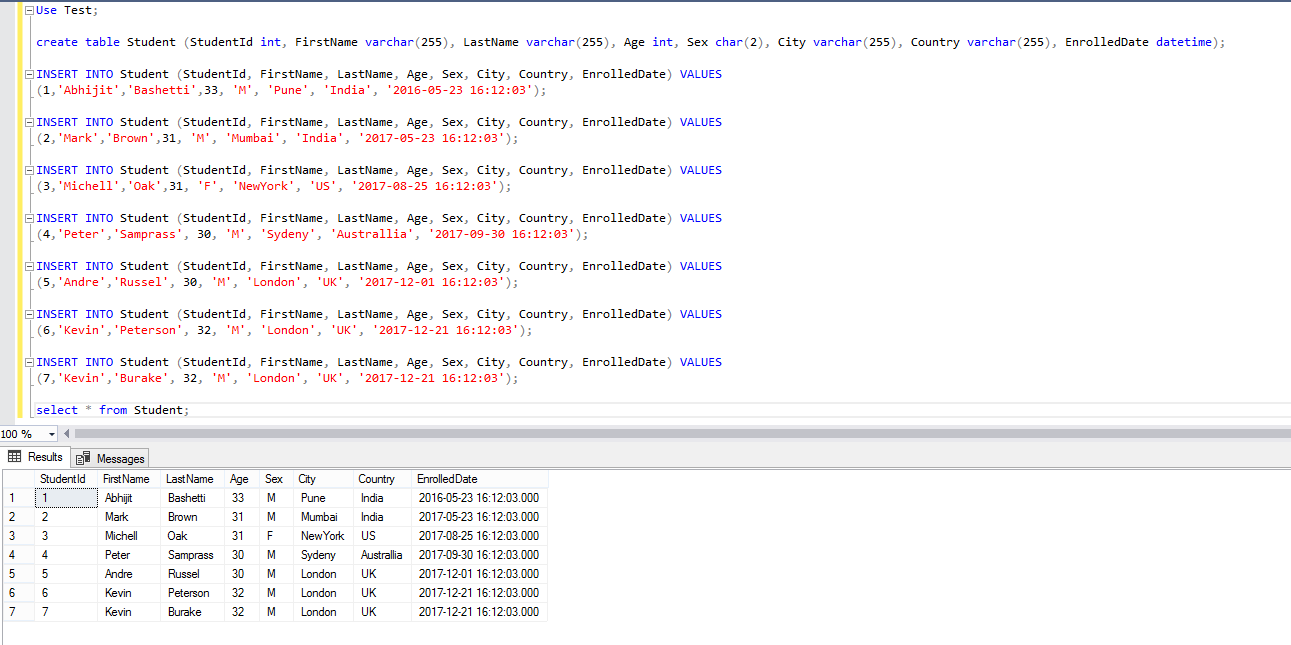
Add the data to Table Student one by one.

INSERT INTO Student (StudentId, FirstName, LastName, Age, Sex, City, Country, EnrolledDate) VALUES
(8,'David','Bruce', 32, 'M', 'Paris', 'FRANCE', GETDATE());

INSERT INTO Student (StudentId, FirstName, LastName, Age, Sex, City, Country, EnrolledDate) VALUES
(9,'Steve','Warne', 30, 'M', 'Paris', 'FRANCE', GETDATE()-200);

INSERT INTO Student (StudentId, FirstName, LastName, Age, Sex, City, Country, EnrolledDate) VALUES
(10,'Ajit','Patil', 32, 'M', 'Pune', 'India', GETDATE()-100);

INSERT INTO Student (StudentId, FirstName, LastName, Age, Sex, City, Country, EnrolledDate) VALUES
(11,'Steve','Scot', 32, 'M', 'Paris', 'FRANCE', GETDATE()-50);


Once you update the file, go the
Go the path C:\logstash-6.5.4\logstash-6.5.4\bin> on the command prompt.
run the below command "logstash -f logstashMSSQL_Test.conf"

C:\logstash-6.5.4\logstash-6.5.4\bin>logstash -f logstashMSSQL_Test.conf


To verify the Data on the ElasticSeach side click the link on the browser.
http://localhost:9200/student/_search?pretty=true


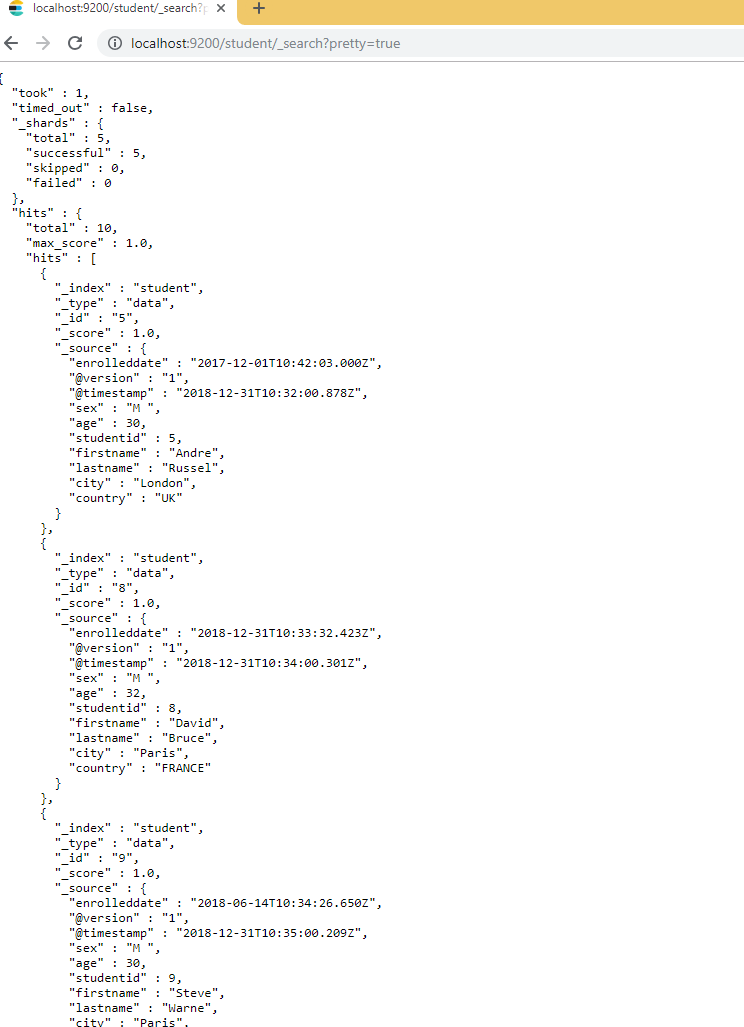
Check the data in descending order. You can verify the when the data is added to elastic search by checking the timestamp of it.
http://localhost:9200/student/_search?q=*&sort=studentid:desc&pretty=true


To check more properties visit https://www.elastic.co/guide/en/logstash/current/plugins-inputs-jdbc.html

Example of Migrating the MSSQL Data to ElasticSearch using the Logstash.

Example of MSSQL SERVER DATABASE + LogStash + Elastic Search

Step 1 :

I assume the MSSQL server database is installed.

Let create a table and insert some data to it.

Use Test;

create table Student (StudentId int, FirstName varchar(255), LastName varchar(255), Age int, Sex char(2), City varchar(255), Country varchar(255), EnrolledDate datetime);

INSERT INTO Student (StudentId, FirstName, LastName, Age, Sex, City, Country, EnrolledDate) VALUES
(1,'Abhijit','Bashetti',33, 'M', 'Pune', 'India', '2016-05-23 16:12:03');

INSERT INTO Student (StudentId, FirstName, LastName, Age, Sex, City, Country, EnrolledDate) VALUES
(2,'Mark','Brown',31, 'M', 'Mumbai', 'India', '2017-05-23 16:12:03');

INSERT INTO Student (StudentId, FirstName, LastName, Age, Sex, City, Country, EnrolledDate) VALUES
(3,'Michell','Oak',31, 'F', 'NewYork', 'US', '2017-08-25 16:12:03');

INSERT INTO Student (StudentId, FirstName, LastName, Age, Sex, City, Country, EnrolledDate) VALUES
(4,'Peter','Samprass', 30, 'M', 'Sydeny', 'Australlia', '2017-09-30 16:12:03');

INSERT INTO Student (StudentId, FirstName, LastName, Age, Sex, City, Country, EnrolledDate) VALUES
(5,'Andre','Russel', 30, 'M', 'London', 'UK', '2017-12-01 16:12:03');

INSERT INTO Student (StudentId, FirstName, LastName, Age, Sex, City, Country, EnrolledDate) VALUES
(6,'Kevin','Peterson', 32, 'M', 'London', 'UK', '2017-12-21 16:12:03');

INSERT INTO Student (StudentId, FirstName, LastName, Age, Sex, City, Country, EnrolledDate) VALUES
(7,'Kevin','Burake', 32, 'M', 'London', 'UK', '2017-12-21 16:12:03');

select * from Student;


Step 2 :

Now Install the elastic search by downloading the same from https://www.elastic.co/downloads/elasticsearch

Go to the installed path like "C:\Program Files\Elastic\Elasticsearch\6.5.3\bin". and start the elastic search.


Step 3 :

Now Download the Logstash. https://www.elastic.co/downloads/logstash

Go to the path C:\logstash-6.5.4\logstash-6.5.4\config

Copy the logstash-sample.conf for the MSSQL DATABASE.
Rename it to logstashMSSQL_Test.conf.

Add below properties.

input {
  jdbc {
# the full url string for the mssql server
    jdbc_connection_string => "jdbc:sqlserver://localhost:1433;databaseName=test"
    # The username and password to execute our statement as
    jdbc_user => "sa"
    jdbc_password => "sasa"
    # The path to our downloaded mssql jdbc driver
    jdbc_driver_library => "C:\Users\abhijitb\.m2\repository\com\microsoft\sqlserver\mssql-jdbc\6.2.2.jre8\mssql-jdbc-6.2.2.jre8.jar"
    jdbc_driver_class => "com.microsoft.sqlserver.jdbc.SQLServerDriver"
    # The required query
statement => "select * from Student"
    }
}

output {
  #stdout { codec => json_lines }
  elasticsearch {
  "hosts" => "localhost:9200"
  "index" => "student"
  "document_type" => "data"
  }
}


Go the path C:\logstash-6.5.4\logstash-6.5.4\bin> on the command prompt.
run the below command "logstash -f logstashMSSQL_Test.conf"

C:\logstash-6.5.4\logstash-6.5.4\bin>logstash -f logstashMSSQL_Test.conf


Step 4 :

Its time to verify if the data is migrated to elasticsearch.

If you have windows git go to the path "C:\Program Files\Git\mingw64\bin>"
and execute the command curl -XPOST "localhost:9200/student/_search?pretty=true"
C:\Program Files\Git\mingw64\bin>curl -XPOST "localhost:9200/student/_search?pretty=true"


or go to the browser and type http://localhost:9200/student/_search?pretty=true


Sunday 30 December 2018

Indexing and searching to ElasticSearch by Curl

I have listed down the curl request for indexing the data on ElasticSearch and curl request for searching the data on ElasticSearch.

I am using the Curl provided by the Git. You may need to install Window Git in order to use the same. Once you install Windows GIT. Go to the path cd C:\Program Files\Git\mingw64\bin>


1. To create an index named "customer"

curl -X PUT "localhost:9200/customer?pretty"

Response is :

{
  "acknowledged" : true,
  "shards_acknowledged" : true,
  "index" : "customer"
}

2. To list all the indices availabale

curl -X GET "localhost:9200/_cat/indices?v"

3.  To add a document

curl -X PUT "localhost:9200/customer/_doc/1?pretty" -H "Content-Type: application/json" -d "{\"name\": \"John Doe\"}"

4. To view a specific document

curl -X GET "localhost:9200/customer/_doc/1?pretty"

5. To delete a index

curl -X DELETE "localhost:9200/customer?pretty"
curl -X GET "localhost:9200/_cat/indices?v"

6. To Update a document

curl -X POST "localhost:9200/customer/_doc/1/_update?pretty" -H "Content-Type: application/json" -d "{\"doc\": { \"name\": \"Jane Doe\" }}"

7. To Delete a document

curl -X DELETE "localhost:9200/customer/_doc/1?pretty"

To verift run the below command
curl -X GET "localhost:9200/customer/_doc/1?pretty"

C:\Program Files\Git\mingw64\bin>curl -X GET "localhost:9200/customer/_doc/1?pretty"
{
  "_index" : "customer",
  "_type" : "_doc",
  "_id" : "1",
  "found" : false
}

8. Buld adding documents

curl -H "Content-Type: application/json" -XPOST "localhost:9200/bank/_doc/_bulk?pretty&refresh" --data-binary "@accounts.json"

Check if the index named bank is created
curl "localhost:9200/_cat/indices?v"

9. Search all the document in ascending order

curl -X GET "localhost:9200/bank/_search?q=*&sort=account_number:asc&pretty"

OR

curl -X GET "localhost:9200/bank/_search?pretty" -H "Content-Type: application/json" -d "{\"query\": { \"match_all\": {} }, \"sort\": [{ \"account_number\": \"asc\" }]}"


10. Search document by mentioning the limit

curl -X GET "localhost:9200/bank/_search?pretty" -H "Content-Type: application/json" -d "{\"query\": { \"match_all\": {} }, \"size\": 1 }"

11. Search Document in sorting order

curl -X GET "localhost:9200/bank/_search?pretty" -H "Content-Type: application/json" -d "{\"query\": {\"match_all\": {} }, \"sort\": {\"balance\": { \"order\": \"desc\" } }}"


12. Search all and return data of specific fields

curl -X GET "localhost:9200/bank/_search?pretty" -H "Content-Type: application/json" -d "{\"query\": { \"match_all\": {} }, \"_source\": [\"account_number\", \"balance\"]}"

13. Search for specific document by applying criteria

curl -X GET "localhost:9200/bank/_search?pretty" -H "Content-Type: application/json" -d "{\"query\": { \"match\": { \"account_number\": 20 } }}"
curl -X GET "localhost:9200/bank/_search?pretty" -H "Content-Type: application/json" -d "{\"query\": { \"match\": { \"address\": \"mill\" } }}"

14. Search for specific document by applying AND criteria with Bool with must

curl -X GET "localhost:9200/bank/_search?pretty" -H "Content-Type: application/json" -d "{\"query\": { \"bool\": { \"must\": [{ \"match\": { \"address\": \"mill\" } },{ \"match\": { \"address\": \"lane\" } }]}}}"

15. Search for specific document by applying OR criteria with Bool with should

curl -X GET "localhost:9200/bank/_search?pretty" -H "Content-Type: application/json" -d "{\"query\": { \"bool\": { \"should\": [ { \"match\": { \"address\": \"mill\" } }, { \"match\": { \"address\": \"lane\" } }]}}}"

16. Search for specific document by applying AND & NOT criteria with Bool with should

curl -X GET "localhost:9200/bank/_search?pretty" -H "Content-Type: application/json" -d "{ \"query\": { \"bool\": { \"must\": [{ \"match\": { \"age\": \"40\" } }], \"must_not\": [{ \"match\": { \"state\": \"ID\" } }]}}}"

17. Search Documents by applying some filter like greater than , lesser than to it.

curl -X GET "localhost:9200/bank/_search?pretty" -H "Content-Type:application/json" -d "{ \"query\": { \"bool\": { \"must\": { \"match_all\": {} }, \"filter\": { \"range\": { \"balance\": {\"gte\": 20000, \"lte\": 30000}}}}}}"

18. Search Document by some aggregations

curl -X GET "localhost:9200/bank/_search?pretty" -H "Content-Type:application/json" -d "{ \"size\": 0, \"aggs\": { \"group_by_state\": { \"terms\": { \"field\": \"state.keyword\"}}}}"

Sunday 9 December 2018

Generate the Boilerplate code using Lombok


All the time while doing the programming we do the same thing again and again.The same code is been added by us or we use eclispe to generate the same code. This code is called as boilerplate code. Its the time to get rid of such things. There is a magic available for the same which is called as lombok. Yes, its lombok library which helps you to remove the boilerplate code and also provides some others features. If Lombok is added to your project classpath, you can can easily get rid of all the getters & setters methods, class constructors(argument constructor, no argument constructor), hashcode and equals methods and many more by just adding couple of annotations the class. For more details and other feature please refer https://projectlombok.org/features/all. The guys have created a very nice thing.

I will list down all the annotation provided by the lombok and will see some them with the examples.

@Getter/@Setter : It will generate the getter and setter methods of the class fields. All the methods genearated are by default public. You can set the access level for any field.

@NonNull : Can be used for the parameters of a methos or a constructors for null check. It can be applied to a field as well.

@NoArgsConstructor : It generates constructor with no parameters.

@RequiredArgsConstructor : It generates a constructor with one parameter of each field where it requires special handling.

@AllArgsConstructor : It generates a constructor with 1 parameter for each field in your class.

@ToString : It provides the implementation of toString method to your class where it will print the classs name and the fields of the class.

@EqualsAndHashCode : Same as toString , Lombok provides the implemenation of the equals and hashCode method. It will consider the non-static and non-transient fields. You can also incluse or exclude the fields explicitely @EqualsAndHashCode.Include or @EqualsAndHashCode.Exclude.

@Data : Its combo provided by lombok for some the commonly used annotation. Its combo of
@ToString, @EqualsAndHashCode, @Getter / @Setter and @RequiredArgsConstructor. It covers all of the above in one shot.

Here is an example where I have created a java class named Employee.java
I have added the member as empId,firstName,lastName,address
On the right side, in the outline window you can find all the code generated by lombok.


I have created the object of Employee class and shown how to use the implementation provided by lombok. In this case I have used the toString and equals method.


Saturday 1 December 2018

Split the large xml into smaller xml using xslt.

Split the large xml to smaller xml using XSLT.

Here is sample of source xml.

<?xml version="1.0" encoding="UTF-8"?>
<ABC>
    <END />
    <Tables>
        <START>
            <row>
                <id>111</id>
                <name>abc</name>
                <deptId>1</deptId>
            </row>
            <row>
                <id>112</id>
                <name>abc1</name>
                <deptId>1</deptId>
            </row>
            <row>
                <id>113</id>
                <name>abc3</name>
                <deptId>1</deptId>
            </row>
            <row>
                <id>222</id>
                <name>def</name>
                <deptId>2</deptId>
            </row>
            <row>
                <id>333</id>
                <name>pqr</name>
                <deptId>2</deptId>
            </row>
            <row>
                <id>444</id>
                <name>xyz</name>
                <deptId>2</deptId>
            </row>
            <row>
                <id>555</id>
                <name>lmn</name>
                <deptId>3</deptId>
            </row>
            <row>
                <id>555</id>
                <name>lmn</name>
                <deptId>3</deptId>
            </row>
        </START>
    </Tables>
</ABC>

I have a xml with the above structure.
I have to spilt the xml into 3 xml's based on the different deptId.
I have to Split the xml into smaller one based on change in tag values.
My elemement is deptId whose values is been changed after some rows.
The all elements with same deptId are in a sequence.

The required output is : Its good to have the xml name as the department id.
The first xml be with name 1.xml :

<?xml version="1.0" encoding="UTF-16"?>
<ABC>
    <END />
    <Tables>
        <START>
            <row>
                <id>111</id>
                <name>abc</name>
                <deptId>1</deptId>
            </row>
            <row>
                <id>112</id>
                <name>abc1</name>
                <deptId>1</deptId>
            </row>
            <row>
                <id>113</id>
                <name>abc3</name>
                <deptId>1</deptId>
            </row>
        </START>
    </Tables>
</ABC>

The solution to the above the problem is to use the XSLT.
Create a xsl file like below.

<xsl:transform xmlns:xsl="http://www.w3.org/1999/XSL/Transform" version="2.0">
  <xsl:template match="/">
    <xsl:for-each-group select="//ABC//Tables//START//row" group-adjacent="deptId">
    <xsl:variable name="file" select="concat(deptId,'.xml')"/>
      <xsl:result-document href="{$file}">
        <ABC>
         <END />
          <Tables>
           <START>
            <xsl:copy-of select="current-group()"/>
           </START>
          </Tables>
        </ABC>
      </xsl:result-document>
    </xsl:for-each-group>
  </xsl:template>
</xsl:transform>


Here is the sample piece of java code that need to run.

package com.java.xml;

import java.io.File;

import javax.xml.transform.stream.StreamSource;

import net.sf.saxon.s9api.Processor;
import net.sf.saxon.s9api.SaxonApiException;
import net.sf.saxon.s9api.Serializer;
import net.sf.saxon.s9api.Xslt30Transformer;
import net.sf.saxon.s9api.XsltCompiler;
import net.sf.saxon.s9api.XsltExecutable;

public class SplitXml {

public static void main(String[] args) {
Processor proc = new Processor(false);
XsltCompiler comp = proc.newXsltCompiler();
XsltExecutable exp;
try {
exp = comp.compile(new StreamSource(new File("E://test.xsl")));
Serializer out = proc.newSerializer(new File("E://output.xml"));
Xslt30Transformer trans = exp.load30();
trans.applyTemplates(new StreamSource(new File("E://source.xml")),
out);
} catch (SaxonApiException e) {
e.printStackTrace();
}
}
}