Tuesday 8 November 2011

Multiple core in Solr

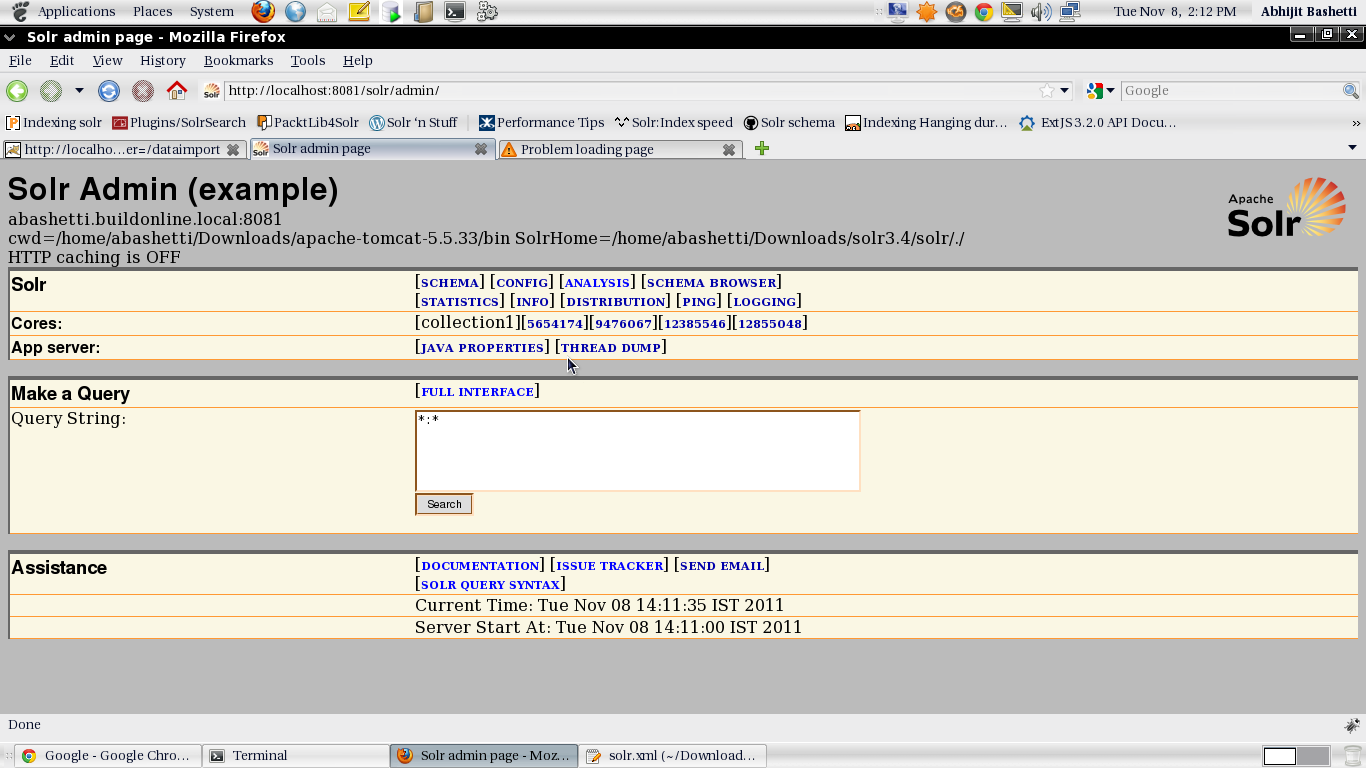
Multiple cores allows you create seperate index files for every single module of your application. Here each core has its own configuration file e.g every core can have its own data-config.xml, solr-config.xml and schema.xml. We can make the seperate index file for each core. You can also administer those cores using http://localhost:8080/solr/ . 


Cores are created on the fly by using http://localhost:8080/solr/admin/cores?action=CREATE&name=coreX&instanceDir=path_to_instance_directory&config=config_file_name.xml&schema=schem_file_name.xml&dataDir=data. Here the Create is action name for creating core, name is the unique name for the core, instanceDir is the path solr home, config is the path of the solrConfig.xml, schema is the path of schema.xml and finally the dataDir is the path where one wants to store the index files.


In my case it was : http://localhost:8080/solr/admin/cores?action=CREATE&name=9476067&instanceDir=/home/abashetti/Downloads/abhijit/solr/&config=/home/abashetti/Downloads/abhijit/solr/conf/solrconfig.xml&schema=/home/abashetti/Downloads/abhijit/solr/conf/schema.xml&dataDir=/home/abashetti/Downloads/abhijit/solr/9476067/document/data 


This will create an entry in the solr.xml file.


The default solr.xml file will look like : 
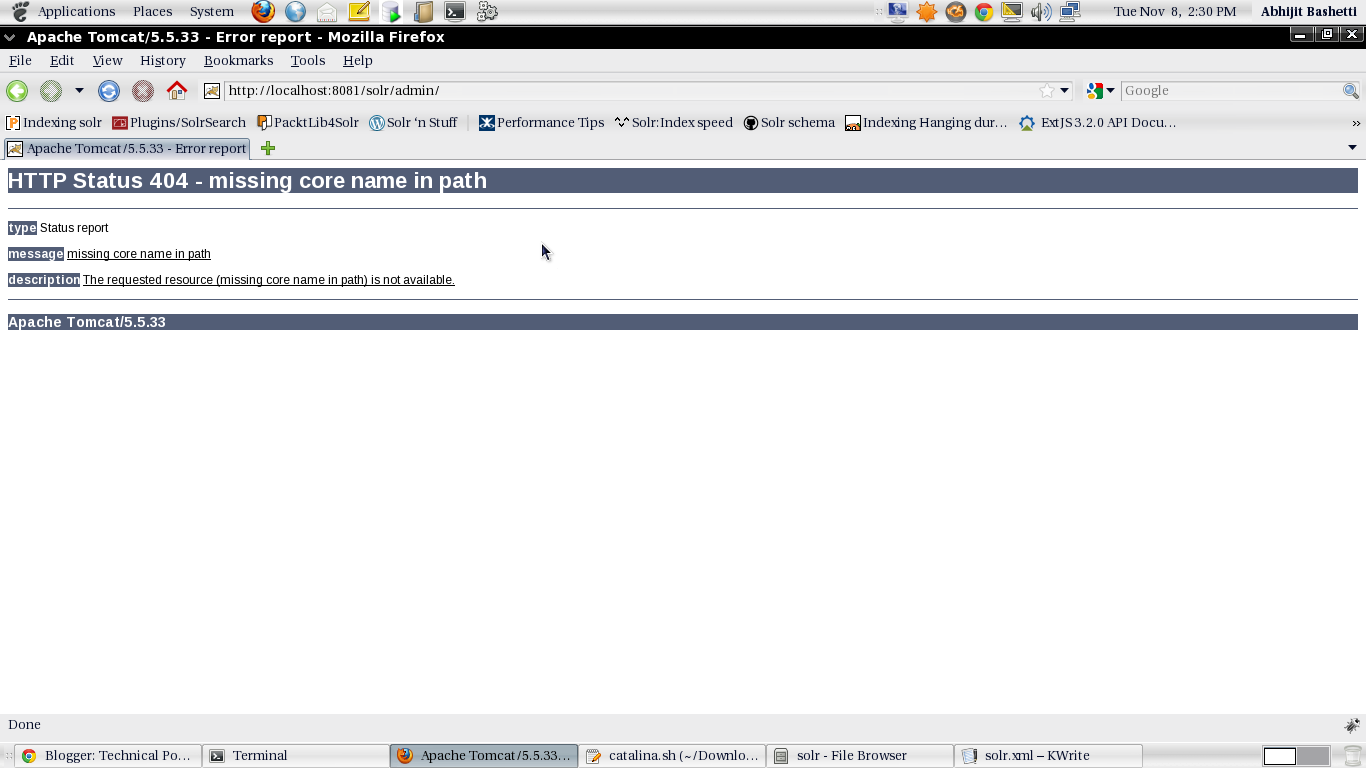
The defaultCoreName must be mentioned the xml file
If the default core name is missing you will get the error on the browser as :


<?xml version="1.0" encoding="UTF-8" ?>

<solr persistent="false">
 <cores adminPath="/admin/cores" defaultCoreName="collection1">
    <core name="collection1" instanceDir="." />
  </cores>
</solr>

To create core on fly one need to modify the solr.xml , the attribute persistent ="true" is the change for it.


<?xml version="1.0" encoding="UTF-8" ?>
<solr persistent="true">
<cores adminPath="/admin/cores" defaultCoreName="collection1">
    <core name="collection1" instanceDir="." />
    <core name="9476067" instanceDir="./"             config="/home/abashetti/Downloads/abhijit/solr/conf/solrconfig.xml"
schema=/home/abashetti/Downloads/abhijit/solr/conf/schema.xml
dataDir="/home/abashetti/Downloads/abhijit/solr/9476067/data"
/>
    <core name="12385546" instanceDir="./" 

config="/home/abashetti/Downloads/abhijit/solr/conf/solrconfig.xml"
schema=/home/abashetti/Downloads/abhijit/solr/conf/schema.xml

dataDir="/home/abashetti/Downloads/abhijit/solr/12385546/data"/>

</cores>


</solr>


The core can be reloaded, removed on the fly. To remove/unload the core on fly use the url
         
http://localhost:8080/solr/admin/cores?action=UNLOAD&core=9476067&deleteIndex=true


The above url will remove the entry of core from solr.xml and remove the index files from the dataDir.


Here the UNLOAD is the action for removing the core and core attribute asks you for the core name and if you want to delete the index files then set deleteIndex value is true. If deleteIndex is false then solr will remove only the core entry from the solr.xml.

The url to check all the core is http://localhost:8080/solr/admin/ 


Saturday 15 October 2011

oracle case insensitive

Searching on column which contains the document name and document name is in Lower case and Upper case. To find the document with document name the query would be:

Select d.document_name from document d where LOWER(d.document_name) like LOWER('%java%')

Select d.document_name from document d where UPPER(d.document_name) like UPPER('%java%')

Sunday 9 October 2011

Converting VARCHAR2 to CLOB and CLOB to VARCHAR2 for ORACLE 10g


1. Converting Varchar2 to Clob

ALTER TABLE TEST ADD (TEMP_DESCRIPTION_TEXT  CLOB);

Add a column named "TEMP_DESCRIPTION_TEXT"to the table whose data type will be CLOB.

UPDATE TEST SET TEMP_DESCRIPTION_TEXT=DESCRIPTION_TEXT;
COMMIT;

Copy the text from existing column "DESCRIPTION_TEXT" to the new column "TEMP_DESCRIPTION_TEXT".

ALTER TABLE TEST DROP COLUMN DESCRIPTION_TEXT;

Drop the old column named "DESCRIPTION_TEXT".

ALTER TABLE TEST RENAME COLUMN TEMP_DESCRIPTION_TEXT TO DESCRIPTION_TEXT;

Rename the new column "TEMP_DESCRIPTION_TEXT" with old name "DESCRIPTION_TEXT".

2. Converting Clob to Varchar2


ALTER TABLE TEST ADD (TEMP_DESCRIPTION_TEXT  VARCHAR2(4000 BYTE));

Add a column named "TEMP_DESCRIPTION_TEXT"to the table whose data type will be VARCHAR2.


UPDATE TEST SET TEMP_DESCRIPTION_TEXT=DBMS_LOB.SUBSTR(DESCRIPTION_TEXT,4000,1);
COMMIT;

Copy the text from existing column "DESCRIPTION_TEXT" to the new column "TEMP_DESCRIPTION_TEXT". 

ALTER TABLE TEST DROP COLUMN DESCRIPTION_TEXT;

Drop the old column named "DESCRIPTION_TEXT".

ALTER TABLE TEST RENAME COLUMN TEMP_DESCRIPTION_TEXT TO DESCRIPTION_TEXT;

Rename the new column "TEMP_DESCRIPTION_TEXT" with old name "DESCRIPTION_TEXT".

Friday 30 September 2011

Solr : Use of NGram Filter factory for wild card search


WildCard Search with Solr.
Considering a scenario where one wants to have the wildcard search. In the same case Solr has provided a N-gram filter. Lets see how to use the same for various requirements. Solr has provided many tokenizers and filters. Combine these tokenizers and filters to get the desired result. The wildcard
field can be used for autocomplete feature.

  1. To have the forward wildcard search create the field type in solr schema.xml as :
<fieldType name="wildCardType" class="solr.TextField" sortMissingLast="true" omitNorms="true" positionIncrementGap="100">
<analyzer type="index">
<tokenizer class="solr.KeywordTokenizerFactory"/>
<filter class="solr.LowerCaseFilterFactory"/>
<filter class="solr.EdgeNGramFilterFactory" minGramSize="3" maxGramSize="50" side="front"/>
</analyzer>
<analyzer type="query">
<tokenizer class="solr.KeywordTokenizerFactory"/>
<filter class="solr.LowerCaseFilterFactory"/>
</analyzer>
</fieldType>

The text to be indexed is “Enterprise”
KeywordTokenizerFactory output is :
Enterprise
LowerCaseFilterFactory output is :
enterprise
NgramFilterFactory output is :
ent ente enter enterp enterpr enterpri enterpris enterprise

The final output for indexing is : ent ente enter enterp enterpr enterpri enterpris enterprise

In this case if you enter “enter*” or “enterpr*” you will get the result.

  1. To have the backward wildcard search create the field type in solr as :
    only one change for the backward wildcard search is the change the side to back.
    <filter class="solr.EdgeNGramFilterFactory" minGramSize="3" maxGramSize="50" side="back"/>
  2. To use the wildcard search from both side create the field type in solr as :
    In this case add Ngram filter twice.
<filter class="solr.EdgeNGramFilterFactory" minGramSize="3" maxGramSize="50" side="front"/>
<filter class="solr.EdgeNGramFilterFactory" minGramSize="3" maxGramSize="50" side="back"/>

The text to be indexed is “Enterprise”
KeywordTokenizerFactory output is :
Enterprise
LowerCaseFilterFactory output is :
enterprise
NgramFilterFactory output is :
ent nte ente ter nter enter erp terp nterp enterp rpr erpr terpr nterpr enterpr pri rpri erpri terpri nterpri enterpri ris pris rpris erpris terpris nterpris enterpris ise rise prise rprise erprise terprise nterprise enterprise

The benefit of the 3rd way is when search should be for any of the character from the specified word. In my case it was the title of the document to be searched in similar way. So I indexed the title using two n-gram , one form front and other from back as shown above. But I suggest not use use this for long text like documents content, as it will take hamper the indexing performance. This field type is useful when you want to search for any of characters from that word and case like autocomplete.

You can create a customised field type using the tokenizers and filters provided by solr.
Create you own field type and analyse the same using the analysis admin page of solr.
Link to the analysis page is http://localhost:8080/solr/admin/analysis.jsp. The analysis.jsp can be used to verify the search match. It helps you in investigating what went wrong with the indexing and query output.

The analysis page looks like this for the above wildCardType when you use the Ngram filter twice from the front and back side:


If you want matching prefix substrings indexing the word from front side.

Use the below fieldType : 


<fieldType name="wildCardType" class="solr.TextField" sortMissingLast="true" omitNorms="true" positionIncrementGap="100">
<analyzer type="index">
<tokenizer class="solr.KeywordTokenizerFactory"/>
<filter class="solr.LowerCaseFilterFactory"/>
<filter class="solr.EdgeNGramFilterFactory" minGramSize="1" maxGramSize="50" side="front"/>
</analyzer>
<analyzer type="query">
<tokenizer class="solr.KeywordTokenizerFactory"/>
<filter class="solr.LowerCaseFilterFactory"/>
</analyzer>
</fieldType>


Thursday 29 September 2011

SOLR Oracle data-importer with variableResolver in data-config.xml


Most applications store data in relational databases like mysql , oracle , db2 ...and searching over such data is a common use-case. The DataImportHandler is a Solr contrib that provides a configuration driven way to import this data into Solr. For the same we will create the data-config.xml. The data-config.xml will have the variable in the query.


The data-config for MySql will look like this :

<dataConfig>
<dataSource name="ds-db" driver="com.mysql.jdbc.Driver" url="jdbc:mysql://localhost/dbname" user="root" password="root"/>
<dataSource name="ds-file" type="BinFileDataSource"/>
<document name="documents">
<entity name="book" dataSource="ds-db" query="select distinct
book.id as id,
book.title,
book.author,
book.publisher,
from Books book
where book.book_added_date >= to_date($ {dataimporter.request.lastIndexDate}, 'DD/MM/YYYY HH24:MI:SS')))"

transformer="DateFormatTransformer">
<field column=”id” name=”id”/>
<field column=”title” name=”title”/>
<field column=”author” name=”author”/>
<field column=”publisher” name=”publisher”/>
<entity name=”content” query=”select description from content where content_id='${book.id}'”>
<field column=”description” name=”description”/>
</entity>
</entity>
</document>
</dataConfig>

In the url you need to pass the variable resolver with value.
The url to start the data-import in this case will be :
http://localhost:8080/solr/admin/select/?qt=/dataimport&command=full-import&clean=false&commit=true&lastIndexDate='08/05/2011 20:16:11'

For the first time indexing you need pass “lastIndexDate=null”.


The data-config for Oracle will look like this :

<dataConfig>
<dataSource name="ds-db" driver="oracle.jdbc.driver.OracleDriver" url="jdbc:oracle:thin:@127.0.0.1:1521:test" user="dev" password="dev"/>
<dataSource name="ds-file" type="BinFileDataSource"/>
<document name="documents">
<entity name="book" dataSource="ds-db" query="select distinct
book.id as id,
book.title,
book.author,
book.publisher,
from Books book
where book.book_added_date >= to_date($ {dataimporter.request.lastIndexDate}, 'DD/MM/YYYY HH24:MI:SS')))"

transformer="DateFormatTransformer">
<field column=”id” name=”id”/>
<field column=”title” name=”title”/>
<field column=”author” name=”author”/>
<field column=”publisher” name=”publisher”/>
<entity name=”content” query=”select description from content where content_id='${book.Id}'”>
<field column=”description” name=”description”/>
</entity>
</entity>
</document>
</dataConfig>

The change here in data-config.xml for oracle id ${book.Id} and not the ${book.id}. It took me long time to find out this by debugging.


Wednesday 28 September 2011

Indexing database with Solr 3.4 from Oracle Server DATABASE and integration of solr with TIKA.


  1. Download the Tomcat-5.5.33 from here.
  2. Install Tomcat (no special instructions here--just run the install and select directory wherever you wish to install)
  3. Start Tomcat by startup.sh in bin dir.
  4. Verify the installation of Tomcat by going to http://localhost:8080
  5. Download SOLR from one of the mirrors found here (downloaded the apache-solr-3.4.0-src.tgz package) and unzip the package. e.g. Solr is extracted at /home/abashetti/Downloads/apache-solr-3.4.0/
  6. Open the Terminal. Go to the extracted apache solr folder. e.g. cd /home/abashetti/Downloads/apache-solr-3.4.0/solr
  7. Create the solr war. Run the ant commands – ant clean , ant compile and ant dist.
  8. Ant dist will create the *solr*.war in */solr/dist/ folder. e.g. path for the war file is(/home/abashetti/Downloads/apache-solr-3.4.0/solr/dist).
  9. To avail the dataimporter functionality add the apache-solr-dataimporthandler , apache-solr-dataimporthandler-extras jars to solr lib.
  10. The apache-solr-dataimporthandler , apache-solr-dataimporthandler-extras jars are available at */apache-solr-3.4.0/solr/contrib/dataimporthandler/target/
    e.g. path is from where I copied the jar files is (/home/abashetti/Downloads/apache-solr-3.4.0/solr/contrib/dataimporthandler/target/)
    & solr lib path is (/home/abashetti/Downloads/apache-solr-3.4.0/solr/lib).
  11. To extract the text from various document Apache Tika is used. Download Apache Tika from here.
  12. Build the source code of Apache Tika using maven. For maven set up read here.
  13. Copy the jar files named tika-app , tika-bundle , tika-core , tika-parsers from target to solr lib. In my case solr lib path is (/home/abashetti/Downloads/apache-solr-3.4.0/solr/lib).
  14. Create the solr war again after adding the jars. Run the ant commands – ant clean , ant compile and ant dist.

  1. Create a directory SOLR. It is the SOLR HOME, where SOLR will be hosted from
    (e.g. /home/abashetti/Downloads/solr).
  2. Copy the files and folder from path /home/abashetti/Downloads/apache-solr-3.4.0/solr/example/solr to your SOLR HOME. e.g destination path is
    (/home/abashetti/Downloads/solr/).
  3. Visit http://localhost:8080/solr/admin to make sure everything is still running.
  4. Go to the path /home/abashetti/Downloads/apache-solr-3.4.0/solr/example/solr/conf.
  5. Create a file data-config.xml. Add the database connection information and the query
    in this file.
  6. Configuring the datasource in the data-config.xml.

<dataConfig>
<dataSource name="ds-db" driver="oracle.jdbc.driver.OracleDriver" url="jdbc:oracle:thin:@127.0.0.1:1521:test" user="root" password="root"/>
<dataSource name="ds-file" type="BinFileDataSource"/>
<document name="documents">
<entity name="document" dataSource="ds-db" query="select distinct
doc.document_id as id,
doc.title,
doc.author,
doc.publisher,
(case when doc.content_format_code not in('doc','pdf','xml','txt','ppt','xls') then
( select path.document_path from document_path path where path.doc_id = doc.id )
else
''
end)contentpath
from ds_document_c doc
where doc.index_state_modification_date >= to_date($ {dataimporter.request.lastIndexDate}, 'DD/MM/YYYY HH24:MI:SS')))" transformer="DateFormatTransformer">

<field column="id" name="id"/>
<field column="title" name="title"/>
<field column="author" name="author"/>
<field column="publisher" name="publisher"/>
</entity>
<entity name="textEntity" processor="TikaEntityProcessor" url="$ {document.CONTENTPATH}" dataSource="ds-file" format="text" onError="continue">

<field column="text" name="text"/>
</entity>
</document>
</dataConfig>

Substitute the database username and password with your database credentials.
  1. Add the location of data-config in solrconfig.xml under the DataImortHandler Section.
<requestHandler name="/dataimport" class="org.apache.solr.handler.dataimport.DataImportHandler">
<lst name="defaults">
<str name="config">data-config.xml</str>
</lst>
</requestHandler>


  1. Edit the schema.xml file. The schema.xml file contains all of the details about which fields your documents can contain, and how those fields should be dealt with when adding documents to the index, or when querying those fields.

<field name=”id” type=”integer” indexed=”true” stored=”true” />
<field name=”title” type=”string” indexed=”true” stored=”true” /> <field name=”author” type=”string” indexed=”true” stored=”true” /> <field name=”publisher” type=”string” indexed=”true” stored=”true” /> <field name=”text” type=”text” indexed=”true” stored=”true” />

Find the “<uniqueKey>” node and change it to: <uniqueKey>id</uniqueKey>

Find the “<defaultSearchField>” node and change it to: <defaultSearchField>text</defaultSearchField>;

Delete all the “<copyField>” nodes.
  1. Copy the *solr*.war file from the dist directory in the unzipped SOLR package to your Tomcat webapps folder.
  2. Rename the *solr*.war file to solr.war
  3. Specify the solr home in the catlina.sh
    JAVA_OPTS="$JAVA_OPTS -Dsolr.solr.home=/home/abashetti/Downloads/solr"
  4. Add the above line just below the JAVA_OPTS="$JAVA_OPTS -Djava.util.logging.manager=org.apache.juli.ClassLoaderLogManager"
  5. Copy the jar ojdbc6.jar to the path : */apache-tomcat-5.5.33/common/lib
  6. Now go the http://localhost:8080/solr/admin/dataimport.jsp. Click on the /DATAIMPORT link. You will see the dataimporter console. Click on the button “Full Import With Cleaning” . It will start indexing. Clicking the on the status button you will know the progress of the indexing. If indexing is in progress it will show the status as “busy” otherwise “Indexing completed for “number” of documents”
  7. Once the indexing is completed, go the http://localhost:8080/solr/admin
click on the search button to check the result.